Create a Policy Set
Policy Set — A predefined collection of properties applied to an activity that controls how a student is able to complete and review their attempt at that activity.
A Policy Set is created using the Edit Policy Set Editor from the Content Repository.
Policy Sets are stored as supplementary content in the Content Repository.
Supplementary content — Components that support the creation, structure, and implementation of content. Example — Themes, Policy Sets, Slide Templates, Course Modules.
A Policy Set can then be applied to selected activities within the Content Repository.
NOTE: You can also apply a Policy Set to a specific activity through the Lesson Editor's Define lesson properties and the Assignment Editor's Define assignment properties.
To create a Policy Set
To create a Policy Set using the Edit Policy Set Editor:
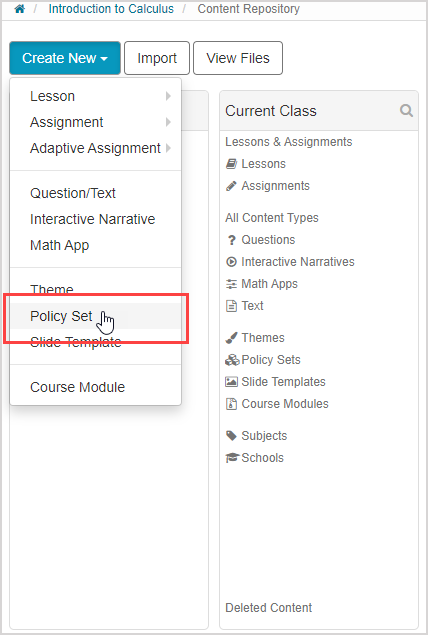
Click Content Repository from the Class Homepage.

Click Create New.

Click Policy Set.
TIP: There is another way to create a new Policy Set:
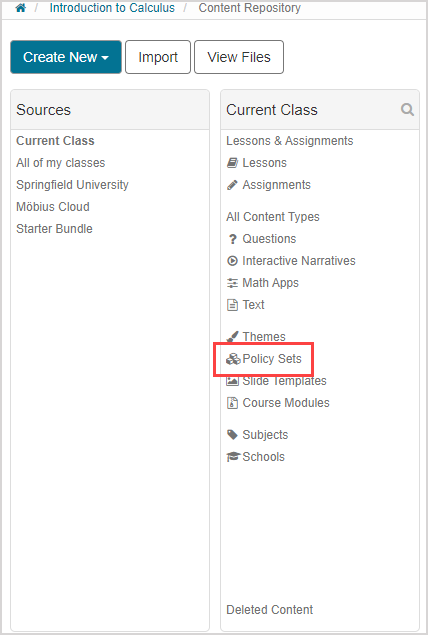
Click Policy Sets from the pane of your selected source.
Click Create New in the Policy Sets pane.
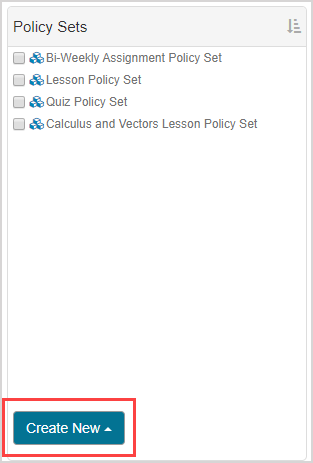
Click Policy Set.

Resume at step 4 of To create a Policy Set.
Define a name for your new Policy Set in the Edit Policy Set Editor.

NOTE: A Policy Set can’t be saved unless it has a defined name.
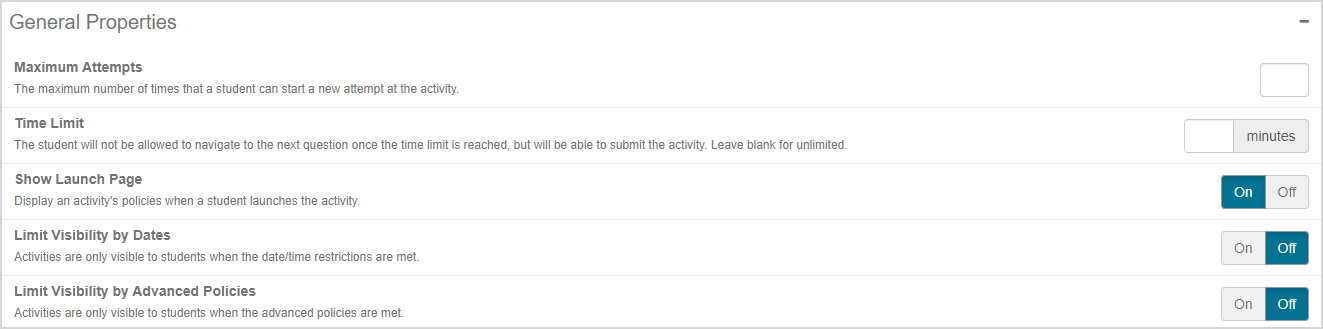
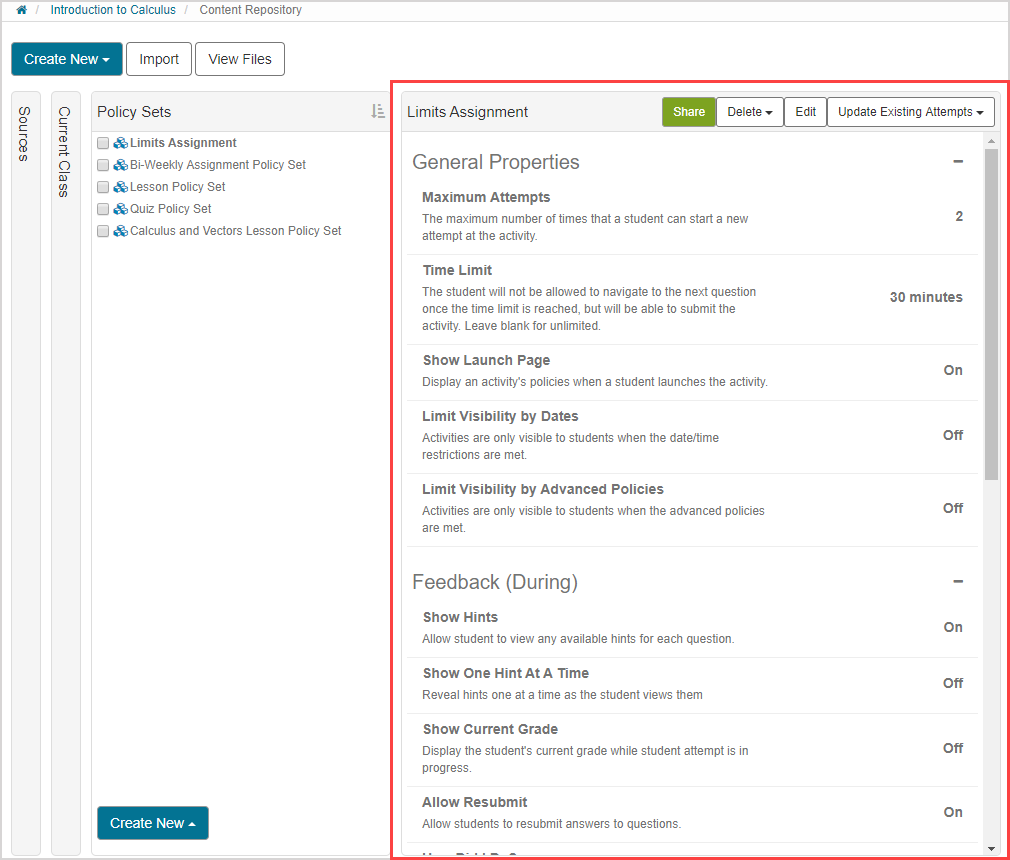
Set the General Properties of the Policy Set:
| Property | Default setting | Explanation of property |
|---|---|---|
| Maximum Attempts | Unset | Enabled — Set the maximum number of allowed attempts at this activity. Enter any number up to 3 digits. If the student exceeds the maximum number of allowed attempts, a message displays prior to the start of the final attempt indicating the attempt restriction. For an exception after the allowed maximum number of attempts, a student can click Request Exception (at the start of the illegal attempt) and a proctor or instructor must log in to permit the additional attempt. Disabled — Leave unset for an unlimited number of allowed attempts. |
| Time Limit | Unlimited | Enabled — If a time limit is set (measured in minutes), the time remaining to complete the activity is continuously displayed while the activity is in progress. The timer flashes red for 10 seconds when 5 minutes remain. The timer is red for the remaining time, and flashes again when the time limit has expired. If the time limit expires while the activity is in progress, the student won't be able to enter any additional responses (even if they're in the process of entering a response) or navigate to another question. However, the student is still able to submit their activity (whether all questions are completed or not). The timer does not stop until the student runs out of time or clicks Submit Assignment. The timer will continue to run even if the student clicks Quit & Save. Disabled — Leave blank for unlimited time limit (no time limit). |
| Show Launch Page | On | On — When a student begins their attempt, the first screen displayed is a preview of the activity properties. Off — The student is not given a preview of the activity properties and immediately begins their attempt. |
| Limit Visibility by Dates | Off | On — The activity is only visible to the student on their Class Homepage and calendars from the defined Start Dates/Times to the End Dates/Times. Off — The activity is always visible to the student on their Class Homepage and calendars outside of the Start and End Dates/Times but unavailable for attempts. |
| Limit Visibility by Advanced Policies | Off | On — The activity is only visible to the student on their Class Homepage and calendars if the student has satisfied the Advanced Policies. Off — The activity is always visible to the student on their Class Homepage and calendars regardless of the requirements of the Advanced Policies. |
NOTE: If the Maximum Attempts property is defined, the Show Launch Page property is automatically enabled.

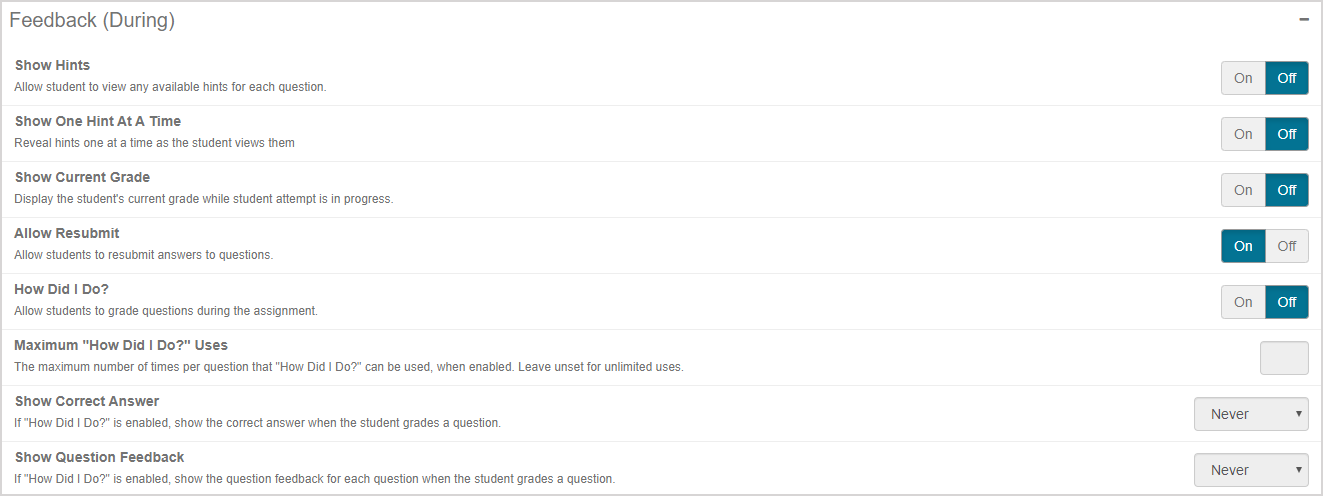
Set the Feedback (During) properties of the Policy Set that control what is allowed while the activity is in progress:
| Property | Default setting | Explanation of property |
|---|---|---|
| Show Hints | Off | On — The student can view available hints for each question. Off — No hints are revealed to the student. |
| Show One Hint At A Time | Off | On — Reveal hints 1 at a time when Show Hints is enabled. Off — All available hints for a question will be revealed simultaneously when Show Hints is enabled. |
| Show Current Grade | Off | On — Display the student’s current grade for the activity while it is in progress. Off — Do not display the student’s current grade for the activity while it is in progress. |
| Allow Resubmit | On | On — Once a student has submitted a response to a question and moves on to the next question, they are allowed to return to a previous question to re-enter a response. Off — Once a student has submitted a response to a question and moves on to the next question, they can’t return to a previous question to re-enter a response. |
| How Did I Do? | Off | On — The How Did I Do? button is visible for the student to click to check the correctness of their response while the activity is in progress. Off — The How Did I Do? button isn't visible and the student can’t check the correctness of their response while the activity is in progress. |
| Maximum “How Did I Do?” Uses | Unlimited | Enabled — A maximum number of times per question that a student can use the How Did I Do? function. Disabled — Leave blank for unlimited usage of the How Did I Do? function. |
| Show Correct Answer | Never | Choose to display the correct answer when a student uses the How Did I Do? function during the activity. Choose from:
|
| Show Question Feedback | Never | Choose to display feedback (response-level feedback and question feedback) when a student uses the How Did I Do? function during the activity. Choose from:
|
IMPORTANT: Use caution with some combinations of settings:
Example — Enabling Allow Resubmit and How Did I Do? provides students with the equivalent of a solution manual while attempting the activity. Students can check the feedback and change their response to the question.
Example — Enabling Show Current Grade and How Did I Do? will permit students to get immediate feedback on questions and then retry the activity.
Set the Feedback (After) properties of the Policy Set that control what is visible to the student after the activity is graded and recorded in the Gradebook:

| Property | Default setting | Explanation of property |
|---|---|---|
| Show Final Grade | On | On — Display the student’s final grade achieved for the activity. Off — Do not display the student’s final grade for the activity. |
| Show Correct Answer | If Incorrect | Choose to display the correct answer for each question when the activity is graded. On the final results screen, the student will have the option to print their results. Choose from:
|
| Show Question Feedback | Always | Choose to display question feedback for each question when the activity is graded. On the final results screen, the student will have the option to print their results. Choose from:
|
Set the Only Applicable to Lessons properties of the Policy Set that control how a lesson is categorized as complete:

| Property | Default setting | Explanation of property |
|---|---|---|
| Complete When | Viewed & Attempted & Passed All Sections | Choose when the lesson will be considered complete based on the student meeting the conditions from the drop-down list. The completion status determines when to show a check mark on the Class Homepage and in the Gradebook. Advanced Policies, when applied to a lesson, also use this setting to determine completeness to allow a student to progress to the next lesson. Choose from:
|
| Allow Submit | Off | On — A Submit Lesson button is provided to the student and the lesson functions as an assignment. Submitting the lesson will generate a grade and will reset the state of all questions in the lesson for subsequent attempts. Off — The lesson is not able to be submitted for grading like an assignment. |
NOTE: The Only Applicable to Lessons properties of a Policy Set will only be used if the Policy Set is applied to a lesson.
Review your defined Policy Set properties and click Save.
NOTE: The Save function only becomes clickable if your new Policy Set is given a name.
A read-only display of the new Policy Set is displayed and it is now available in your Content Repository to be applied to activities.
What's next?
Now that you've created a Policy Set, you're ready for: