Add slide transitions to an interactive narrative
Jump to section
Slide transitions can be added to control the appearance, disappearance, and styling effects of elements on a slide during an interactive narrative presentation.
The selected playback mode for the slide determines how a student interacts with slide transitions.
You'll choose one of the three available playback modes:
- Auto-Pause — The student clicks through each slide transition.
- Set Duration — The slide transitions run automatically in a defined runtime.
- Play Audio — The slide transitions run automatically alongside an audio file.
NOTE: The playback mode that you select for a slide affects how customizable the transition timings are.
The creating and editing of slide transitions is done through the waveform bar of each slide while working in the Interactive Narrative Editor.

Transition markers act as placeholders that can have elements assigned to them and can be added anytime during the interactive narrative authoring process.
![]()
Selecting an element on a slide reveals its Element In marker  (identifies when the element appears on the slide) and Element Out (identifies when the element disappears from the slide) marker
  which can be assigned to transition marker placeholders.
When an element is assigned to a transition marker placeholder, it's no longer a placeholder and is simply a transition marker.
NOTE: Transition markers can be added to a waveform bar that doesn't have any audio or to a waveform bar that already has audio applied. Transition marker placeholders can be inserted while recording audio and later assigned to a slide element. Check out Add audio to an interactive narrative.
You can then modify the details of the transition that occurs at that transition marker. Example — The element appears and its text is transformed from regular weight to bold.
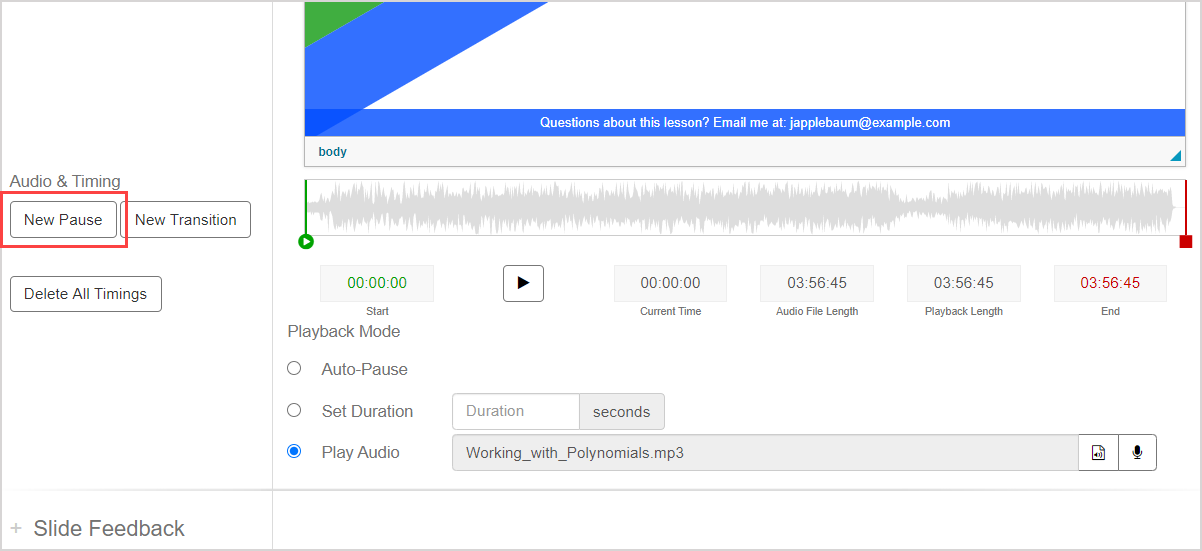
Pauses are another type of transition that can be added to your slide.
General slide transition tips
Here are some general tips for working with slide transitions in the Interactive Narrative Editor:
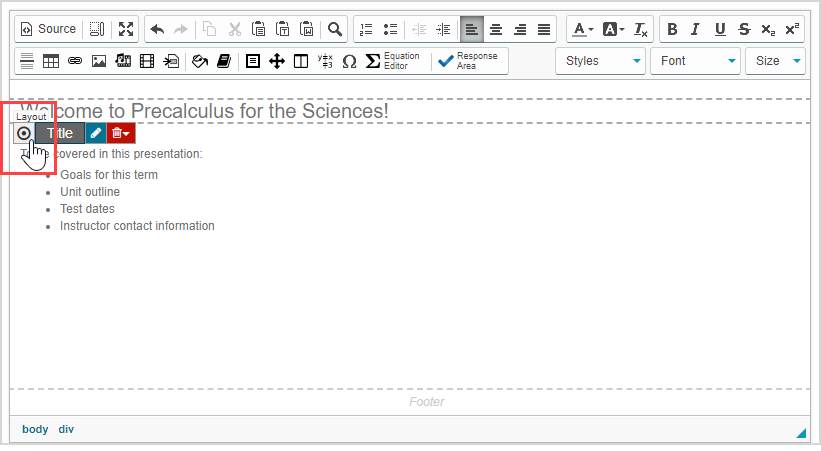
- Select an element to apply a slide transition to by hovering your cursor over the block element and clicking the Select icon
 .
.
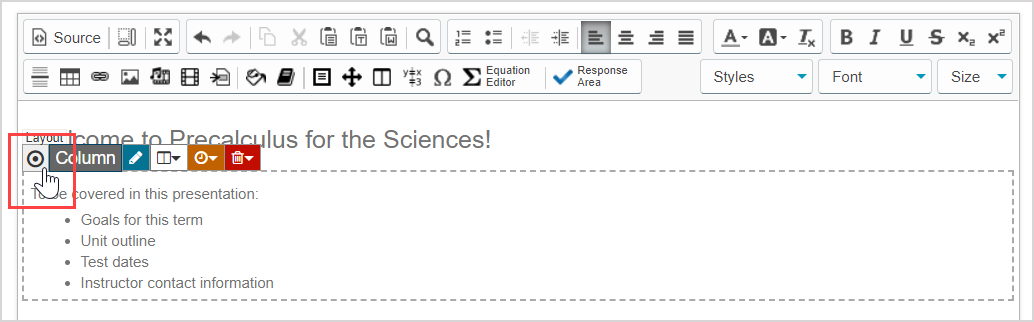
TIP: Alternatively, you can select an element by highlighting the entire element (Example — an entire table) or a portion of the element (Example — a single word or a sentence within a table).
- Hover your cursor over a transition marker in the waveform bar to highlight the slide element that it's assigned to.
NOTE: Hovering your cursor over the transition marker that is an Element In transition marker highlights the slide element in green. Hovering your cursor over the transition marker that is an Element Out transition marker highlights the slide element in red. The same transition marker can act as the Element In marker for one element and the Element Out marker for another.
- Right-click on a marker (Example — transition marker, pause marker) in the waveform bar and click Set Time to fine-tune the time stamp of the marker.
- You can then enter an exact time stamp for the marker.

NOTE: The Set Time option is only available if using the Play Audio playback mode.
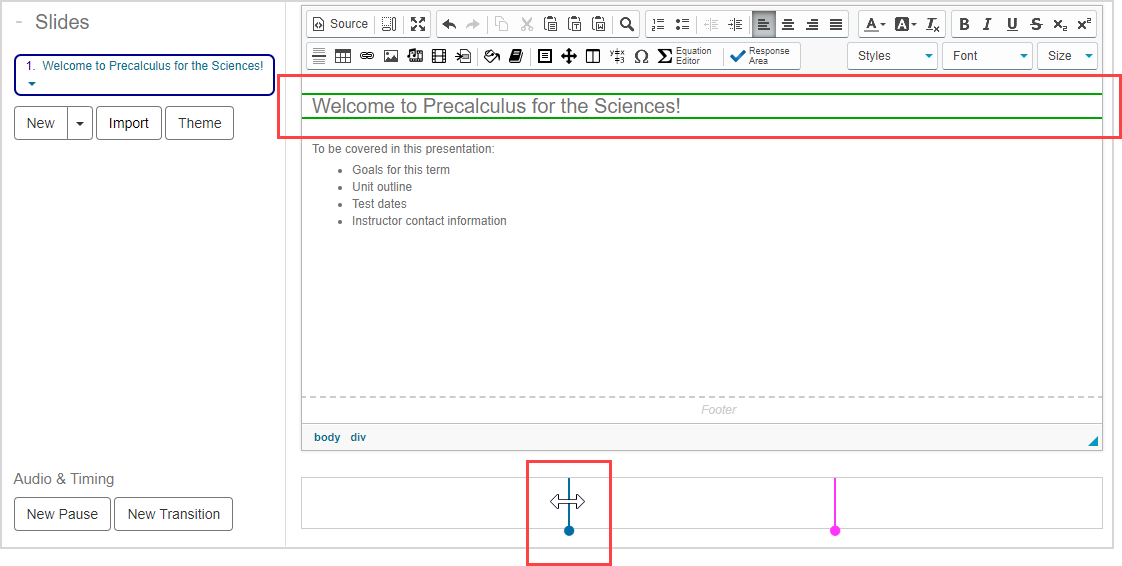
- Clicking on the waveform bar reveals a the waveform bar selector that indicates the current selected position in the slide's timing.

NOTE: The waveform bar selector is only available if using the Play Audio playback mode.
Select a playback mode
Select the radio button of the playback mode that you want to use for each slide of your interactive narrative:
NOTE: You can select a different playback mode for each slide of your interactive narrative, but each slide can only have one playback mode selected.

- Auto-Pause — The presentation will automatically pause before moving to the next transition (selected by default).
- Requires the student to click through each transition marker that's found in the waveform bar using the Previous Slide and Next Slide buttons (or by using keyboard arrows).
- Transition markers added to this playback mode are assigned to pre-defined positions and can't be repositioned.
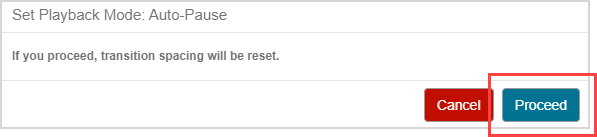
NOTE: If you've added transitions in Set Duration or Play Audio mode, your transition marker spacing will be irreversibly overridden if you change to the Auto-Pause mode. Click Proceed to allow the spacing override to the pre-defined transition marker spacing of Auto-Pause mode.
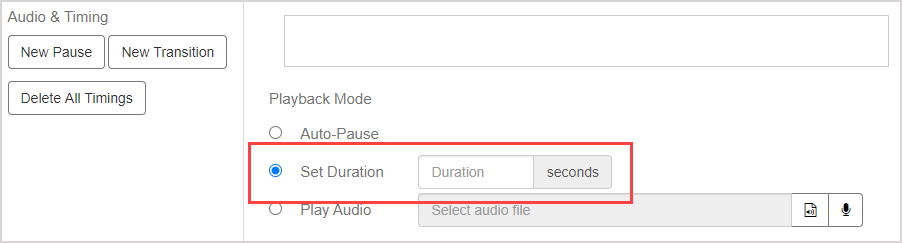
- Set Duration — Define the number of seconds that the slide displays for before automatically transitioning to the next slide.
- All transitions that are found in the waveform bar are automatically completed within a set number of seconds without requiring the student to manually navigate through each transition.
- You can reposition transition markers as needed in this mode.
- Pauses can be added to this mode.
TIP: Define the number of seconds in the Set Duration field to control how long it will take for the slide to complete all of your assigned transitions in the waveform bar.
- Play Audio — Upload or record an audio file to accompany your slide.
- All transitions that are found in the waveform bar are automatically completed while an audio file is playing.
- The total runtime of the slide is determined by the length of the applied audio file.
- You can reposition transition markers as needed in this mode.
- Pauses can be added to this mode.
TIP: Check out Add audio to an interactive narrative for help with uploading or recording audio to your interactive narrative.
Add a slide transition
To add a transition to a slide:
Select the element that you want to use to assign a transition.
NOTE: Selecting an element reveals its Element In marker and Element Out marker on the waveform bar.

- The Element In marker indicates when the element appears on the slide.
- Its default position is at the beginning of the waveform bar.
- The Element Out marker indicates when the element disappears from the slide.
- Its default position is at the end of the waveform bar.
Click New Transition to insert a randomly-colored transition marker placeholder into the waveform bar.
![]()
TIP: Alternatively, you can:
Click-and-drag the Element In or Element Out marker to a position in the waveform bar.

The repositioned Element In or Element Out marker is automatically assigned a randomly-colored transition marker.
![]()
Resume at step 5 of Add a slide transition.
NOTE: The default positioning of a new transition marker placeholder depends on the selected playback mode:
- Auto-Pause — New transition markers are inserted at pre-defined, equally-spaced increments.
- Set Duration — New transition markers are inserted in sequence to the right of the start of the waveform bar.
- Play Audio — New transition markers are inserted in sequence to the right of the waveform bar selector.
NOTE: Transition marker placeholders can't be repositioned if your slide is authored using the Auto-Pause playback mode.
The randomly-colored transition marker placeholder is inserted into the waveform bar.
![]()
Click-and-drag the Element In or Element Out marker to the transition marker that you added at step 2 to define when the element appears or disappears, respectively.
![]()
IMPORTANT: Be sure to delete any transition marker placeholders that aren't assigned to an element. Example — Unassigned transition marker placeholders require a student to click through them without any changes occurring on the slide if the slide is authored using the Auto-Pause playback mode. If a slide has three transition marker placeholders but only two of them are assigned to an element's transition, the student will still have to click three times to complete the slide instead of just twice.
![]()
Follow the steps in the Edit a slide transition section of this help topic to further edit the details of what happens to the element at this transition marker.
![]()
TIP: You can add additional transition markers to the selected element that affect element styling instead of just its appearance or disappearance (Example — an element's first transition could be that it appears on the slide and its second transition could be that the element’s text becomes bold):
Click-and-drag the Add Transition icon
 (located at the beginning of the waveform bar) to a location on the waveform bar to produce another transition marker (or to an existing transition marker). You can do this as many times as needed.
![]()
Follow the steps in the Edit a slide transition section of this help topic to edit the details of what happens to the element at this transition marker. Example — You can assign the element to have its text become bold at this transition marker.
![]()
The styling transition indicator
 appears over the transition marker.

Repeat steps 1 to 5 as many times as needed for your slide elements and click Save.

Add a slide transition while recording audio
You can add a transition to a slide while recording audio.
This method only inserts transition marker placeholders that aren't linked to an element.
After you've finished your recording and inserting your transitions while recording, you'll need to return to the slide editing screen to assign an element to the inserted transition marker placeholders.
TIP: Check out Add audio to an interactive narrative for more details on uploading or recording slide audio.
To add a transition to a slide while recording audio:
Click Record on the Record Audio page to start the recording for the selected slide.
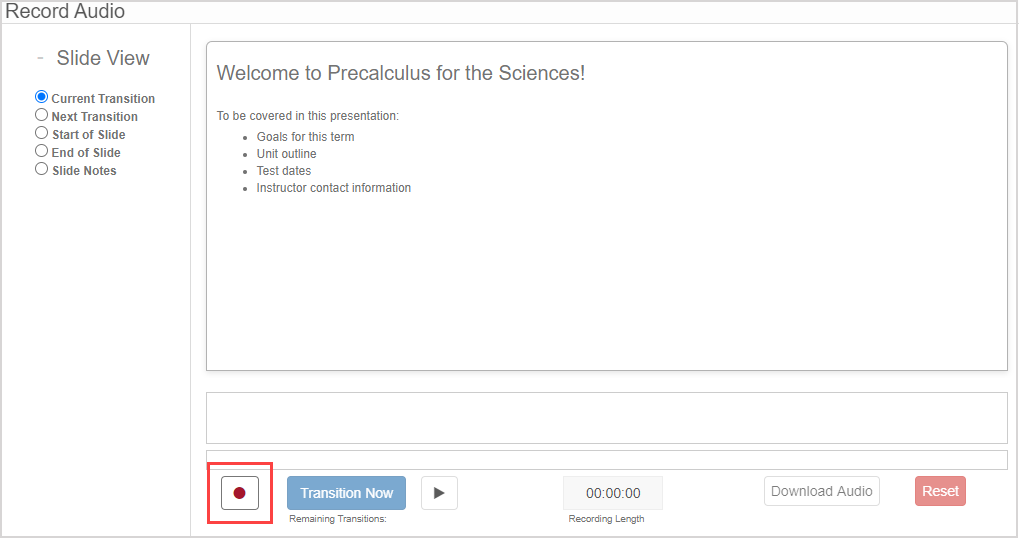
Click Transition Now during your recording to insert a transition marker placeholder into the waveform bar on the Record Audio page.
![]()
TIP: Click Transition Now as many times as needed throughout your recording.
TIP: Alternatively, press Spacebar on your keyboard instead of the Transition Now button.
NOTE: Any transition markers that you've previously inserted from the slide editing page will appear in the waveform bar while you're recording audio and are summarized in the Remaining Transitions field.
![]()
Transition marker placeholders are inserted throughout your recording's waveform bar. Click Stop to finish your recording.
![]()
Check out the Record an audio file section of the Add audio to an interactive narrative help topic to proceed with saving your recording.
Return to the slide editing page to assign elements to your transition marker placeholders.
Edit a slide transition
To edit an applied slide transition:
Select the element that you want to use to assign a transition.
All applied transitions for the selected element are indicated on the waveform bar with the appropriate transition icon. Double-click the transition icon for the element that you want to edit in the waveform bar.
![]()
Make your edits as needed in the Edit Transition window. You can make the following edits:
![]()
- Element appears — Select the check box for the transition marker to indicate that the slide element appears.
- Element disappears — Select the check box for the transition marker to indicate that the slide element disappears.
- Add highlight — Select the check box for the transition marker to indicate that the slide element changes to the style selected from the drop-down list.
- Remove highlight — Select the check box for the transition marker to indicate that the highlighting style selected from the drop-down list is removed.
- Add class(es) — Select the check box and specify a CSS class to apply to the slide element at the transition point (use a space as a separator within your CSS).
- Remove class(es) — Select the check box and specify a CSS class to be removed from a slide element (use a space as a separator within your CSS).
TIP: Are you editing the transition of a video element? You'll see these additional editing options:

- Skip to Time — Select the check box and enter the time in seconds (with respect to the run-time of the video) for the transition marker to indicate where you want the start or pause playback of the video to occur.
- Example — 0 seconds indicates the beginning of the video.
- Not entering a value is the equivalent of 0 seconds.
- Start Playback — Select the check box for the transition marker to indicate that the video starts to play (and starts at the video time stamp defined in the Skip to Time field).
- Pause Playback — Select the check box for the transition marker to indicate that the video pauses (and pauses at the video time stamp defined in the Skip to Time field).
Either Start Playback or Pause Playback must be selected for a video's individual transition marker (don't select both for a single transition marker).
TIP: You can click Delete (and Remove) to delete the transition marker. If this is performed for both the Element In and Element Out markers, the element is deleted from the slide.
![]()
Click Save and Close.
![]()
NOTE: The styling transition indicator![]() appears over the transition marker if a slide transition other than Element In or Element Out was applied.
appears over the transition marker if a slide transition other than Element In or Element Out was applied.
Add a pause
You can add an automatic pause to the audio of your interactive narrative.
NOTE: Pauses have no effect on slides authored with the Auto-Pause playback mode.
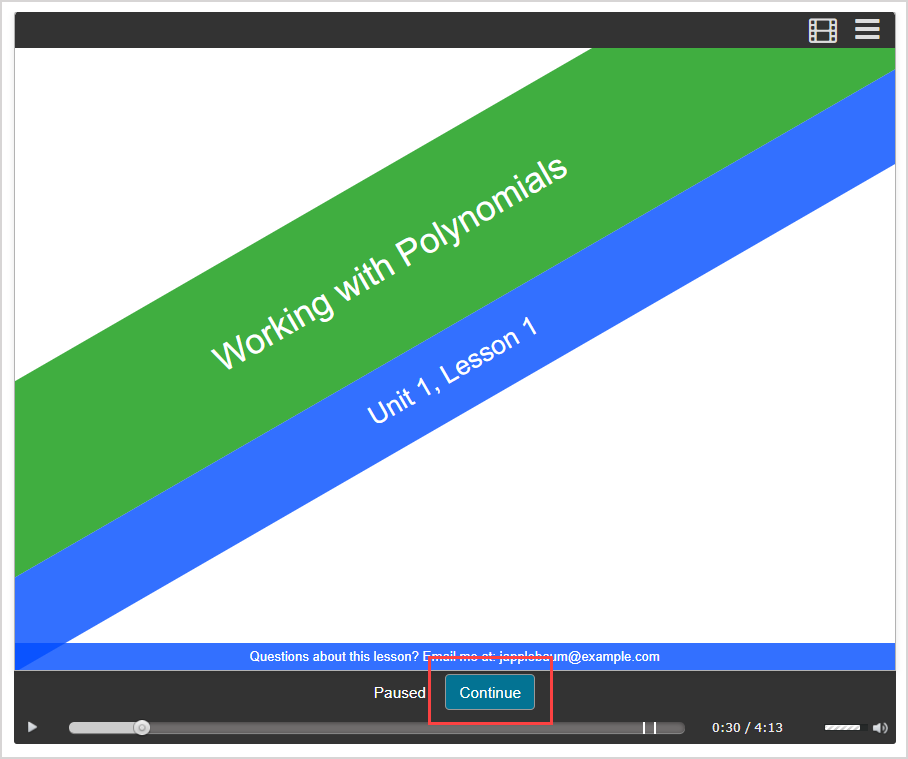
The slide will rest when the progress bar reaches the designated pause point.
The presentation can then be manually resumed by clicking Continue.
To add a pause to your slide:
Click New Pause while editing the selected slide.
A pause marker will appear at the beginning of the waveform bar.

NOTE: The pause marker may overlap with your audio start marker .
.
Click-and-drag the pause marker to desired point in time of the slide.

Click Save.
NOTE: When the pause marker is reached while a student is viewing the interactive narrative, the presentation will rest. The student can click Continue to resume the presentation.
Delete a slide transition
There are three ways to delete a slide transition:
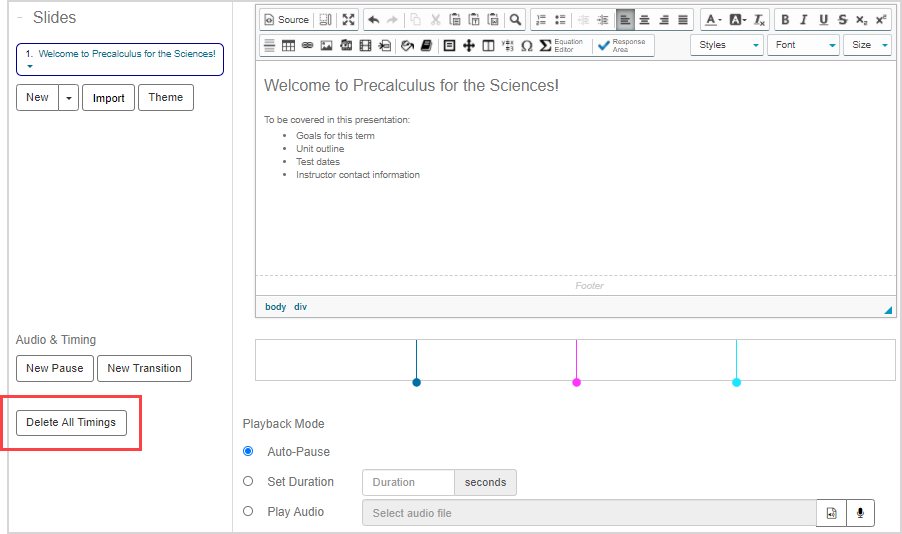
- Click Delete All Timings (and then Yes) on the slide editing page to erase all transition markers from the waveform bar.
- Right-click on a specific transition marker and click Delete to erase a specific transition marker from the waveform bar.

- Hover your cursor over a slide element and click the Remove Timing icon
 (and then click Remove) to erase all transition markers for the selected element from the waveform bar.
