Author an HTML question
An HTML question is an extension of the Maple-graded question type, where the input area is replaced with an arbitrary HTML + Javascript application.
You can define a correct answer and grading code that use Maple syntax.
The HTML and Javascript that you provide need to take a student’s input and return a representation of their answer to the grading code.
TIP: You can include an algorithm in your HTML question! Check out Author an algorithmic question.
NOTE: The correct answer and algorithmic randomization are hidden from the student and aren't visible by simply inspecting the Javascript on the webpage.
To author an HTML question
To author an HTML question from the Question Editor:
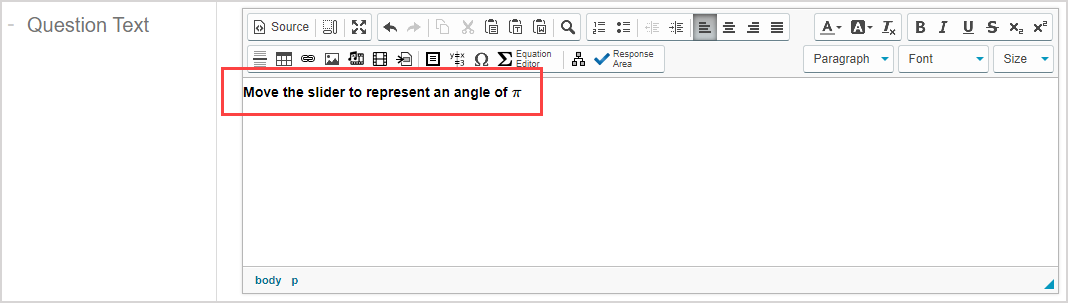
Enter the question statement in the Question Text pane of the Question Editor.
TIP: Check out Use the Visual Editor for details on how to use this toolbar to the fullest to control the visual appearance of your HTML question text.

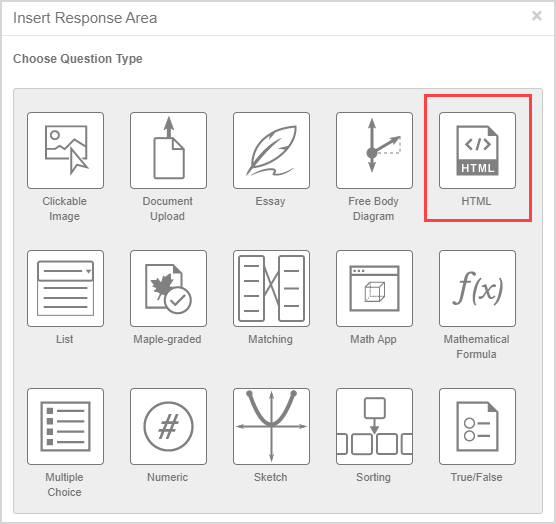
Click Möbius component to select the type of student response for this part of the question.

NOTE: A question can have multiple parts, with each question part using a different type of component. Example — A question could contain two components; the first part using a document upload student response, and the second part a multiple choice student response component.
Click HTML from the list of student response components.
Assign a weight to the response. The default weighting is 1.
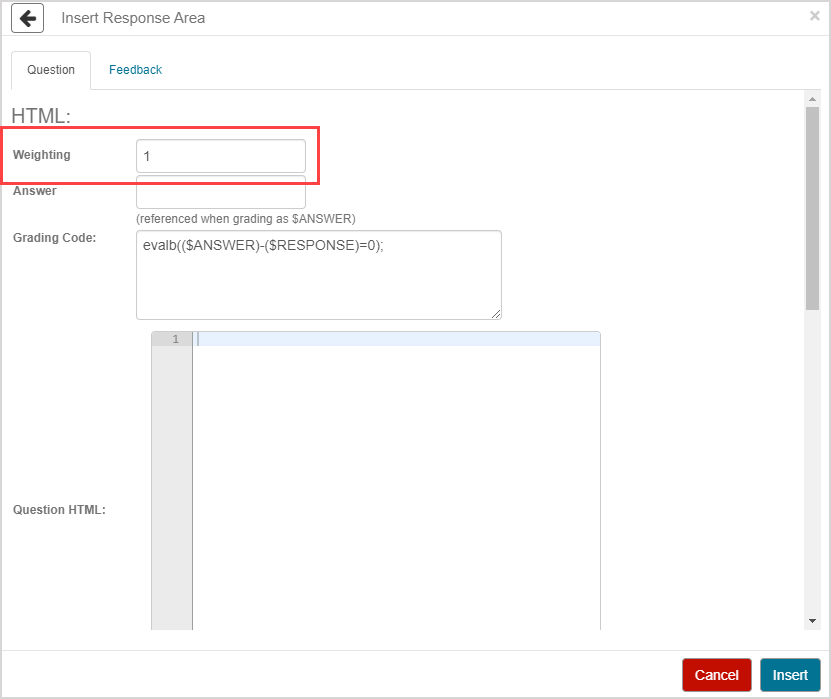
TIP: The weight of the component can be any integer greater than 0, and is calculated proportionate to the total of all weights across the question. Example — A question with two components could have the first weighted as 2, and the second weighted as 4. This means that the second component will be worth twice as much as the first when calculating the total grade for the question.
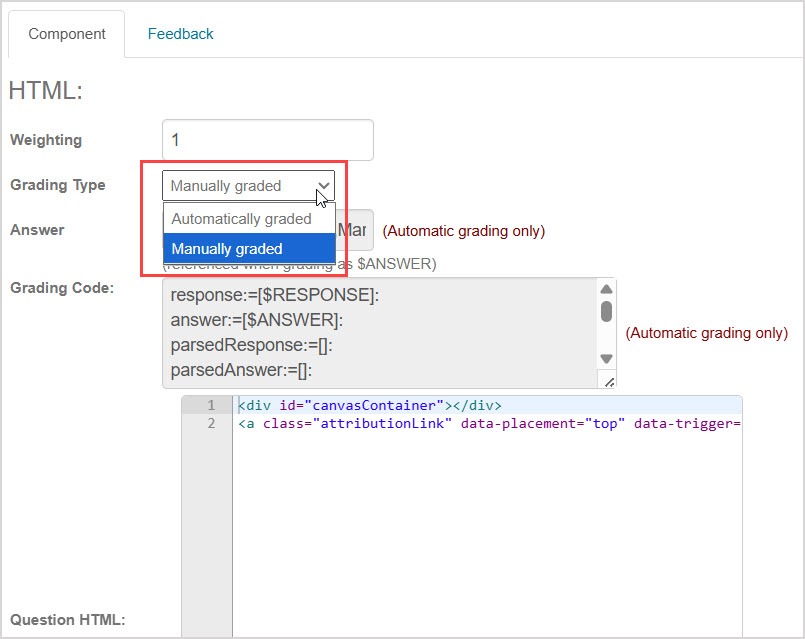
Choose whether the question will be automatically graded or manually graded from the Grading Type menu.
(Automatically graded questions only) Define the correct response in the Answer field.
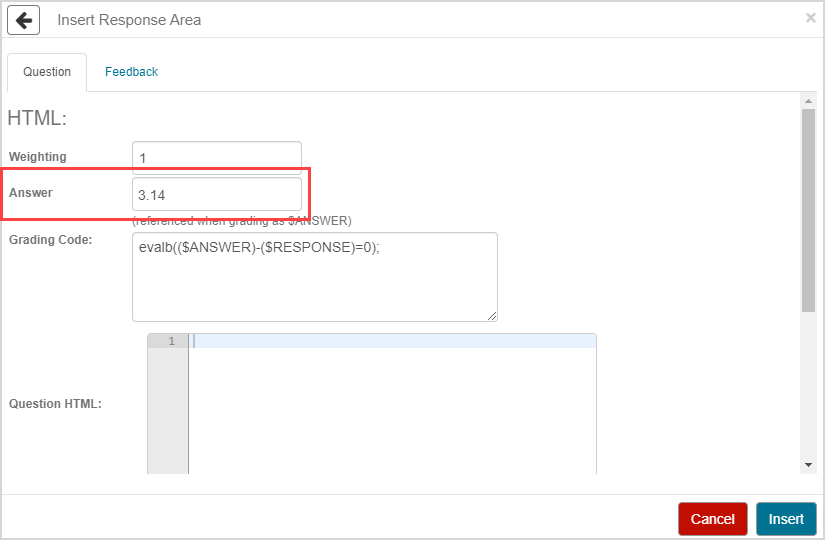
TIP: Follow these rules while defining the correct response in the Answer field:
- The last line of code must evaluate to an expression that is stored to the variable $ANSWER in the grading code, and the Javascript variable answer in the setFeedback() function.
- Complete each line of code in the Answer field with a semicolon (;).
- Add parentheses when appropriate. Example — (x + y) / 2
- Use the long form name for all package functions. Example — VectorCalculus[ArcLength]
- Like a Maple-graded question, you must use valid Maple code to evaluate the answer. Example — Enter 3*x instead of 3x.
(Automatically graded questions only) Define the grading code in the Grading Code field. Example — evalb( abs(evalf(Pi-($RESPONSE))) < 0.4 );
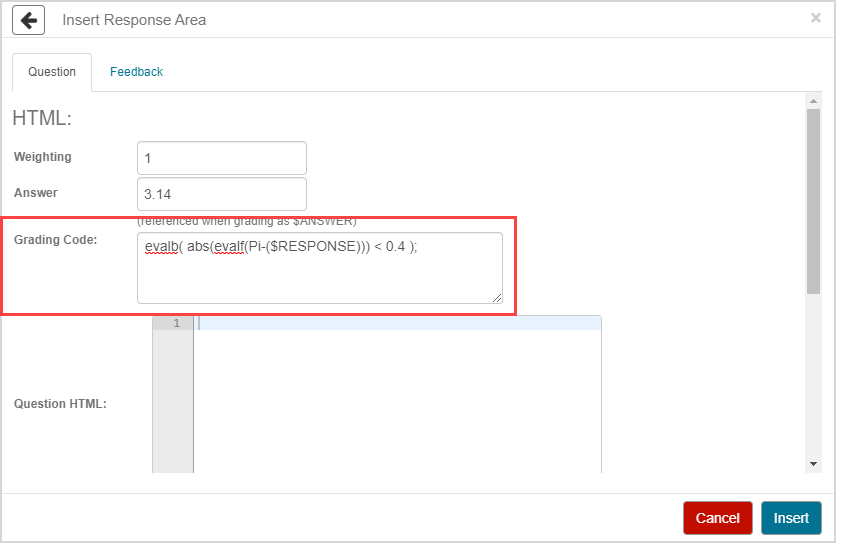
TIP: Follow these rules while defining the correct response in the Grading Code field:
- Like a Maple-graded question, you must use valid Maple code to evaluate the answer.
- The last line of your grading code must evaluate to a Boolean value (true or false) or a floating-point number between 0.0 and 1.0 for partial grading.
- By default, use the Maple command evalb(($ANSWER)-($RESPONSE)=0); as indicated, where $RESPONSE represents the student response and $ANSWER represents the correct answer.
- Use the long form name for all package functions. Example — VectorCalculus[ArcLength]
- Use $RESPONSE to represent the value of the student’s response in your code.
- Before your code is processed by Maple, $RESPONSE is replaced by the output of the Javascript getResponse() function.
- Use $ANSWER to represent the correct answer, as you have provided in the Answer field.
Define the HTML needed to display the component using the Question HTML field.
Example —
<!-- For drawing 2D graphics -->
<script src="https://cdnjs.cloudflare.com/ajax/libs/two.js/0.6.0/two.js"></script>
<div id="canvasContainer"></div>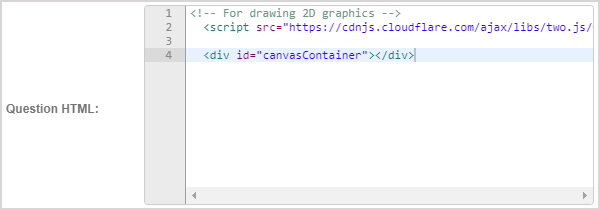
NOTE: The entire HTML component will appear inside of an iframe, so other question text, HTML, and algorithmic variables won't be directly accessible by the question’s Javascript.
TIP: You can add notes to yourself and other authors within your HTML code using the following format:
<!-- This is a comment within HTML code. -->Define the CSS needed to display the component using the Question CSS field.
Example —
#canvasContainer {
border:1px solid #d3d3d3;
}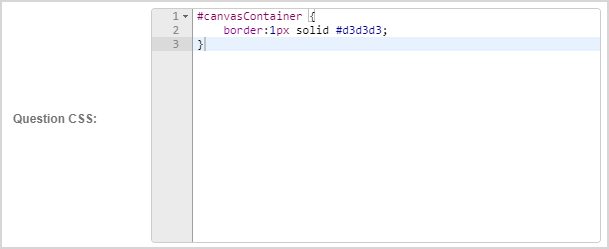
NOTE: The component will appear inside of an iframe, so this CSS won't affect the rest of the question and vice versa.
TIP: You can add notes to yourself and other authors within your CSS code using the following format:
/* This is a comment within CSS code. */Complete the initialize(), setFeedback(), and getResponse() functions template in the Question JavaScript field to customize your question.
- initialize() — Called whenever this component is displayed to either prompt the student for a response or show the student’s response and the correct answer.
- setFeedback(response, answer) — Called when the student’s response and the correct answer are to be displayed next to each other (the variable response will receive the output of getResponse() and the variable answer will receive the value defined in the Answer field).
- getResponse() — Called whenever the question is graded and returns the state of the component such that it can be evaluated by the grading code.
Example —
function initialize(interactiveMode) {
/*Called when the question is being initialized.
interactiveMode: if it is true, interaction is allowed on question.
*/
/*jQuery.getScript("https://cdnjs.cloudflare.com/ajax/libs/two.js/0.6.0/two.js", function() {*/
let elem = jQuery('#canvasContainer')[0];
/* Run the app */
radians.runApp(elem);
/*})*/
/*Your code starts from here:*/
};
function setFeedback(response, answer) {
/*called when response or answer is going to
be rendered.
response: student's response of question.
answer: correct answer of question.*/
/*Your code starts from here:*/
if (response != "No answer") {
radians.setAngle(response);
}
if (answer != null) {
radians.setAngle(answer);
}
};
function getResponse() {
/*called when grade button is clicked,
to retrieve back student's response.*/
/*Your code starts from here:*/
return radians.getAngle();
};
/*Additional functions start from here*/
/* TwoJS http://jonobr1.github.io/two.js/ */
/* colors orangered #FF8000 rgb(0, 200, 255)*/
'use strict';
/* Library namespace */
let radians = {};
(function(rd) {
/* The main application closure */
rd.runApp = function(canvasElem) {
/* app size */
let viewportw = 400;
let viewporth = 300;
/* geometric parameters */
let x0 = 72;
let y0 = 100;
let radius = 50;
let xoffset = 110;
let x;
let y;
let mouse = new Two.Vector();
let styles = {
family: 'proxima-nova, sans-serif',
size: 40,
leading: 40,
weight: 900
};
/* angle constants */
let angle = Math.PI / 2; /* angle in units of pi */
let maxangle = 6 * Math.PI;
/* Make an instance of two and place it on the page.*/
let params = {
width: viewportw,
height: viewporth
};
let two = new Two(params).appendTo(canvasElem);
/* create sliderbar */
let rect = two.makeRectangle(viewportw / 2, viewporth - 20, viewportw - 20, 10);
rect.stroke = 'rgb(0, 200, 255)';
rect.fill = 'rgb(0, 200, 255)'; /* Accepts all valid css color*/
rect.linewidth = 5;
/* create slider marker */
let slidermarker = two.makeCircle(viewportw / 2, viewporth - 20, 10);
slidermarker.fill = '#FF8000';
slidermarker.stroke = 'white'; /* Accepts all valid css color */
slidermarker.linewidth = 3;
/* array to store dynmaic two.js objects */
let elements = [];
rd.drag = function(e) {
let mousex = e.clientX;
if (mousex <= 20) {
angle = 0;
} else if (mousex >= viewportw - 20) {
angle = maxangle;
} else {
angle = maxangle * (mousex - 20) / (viewportw - 40);
}
mouse.set(x, y);
};
rd.dragEnd = function(e) {
jQuery(window)
.unbind('mousemove', radians.drag)
.unbind('mouseup', radians.dragEnd);
};
rd.touchDrag = function(e) {
e.preventDefault();
let touch = e.originalEvent.changedTouches[0];
radians.drag({
clientX: touch.pageX,
clientY: touch.pageY
});
return false;
};
rd.touchEnd = function(e) {
e.preventDefault();
jQuery(window)
.unbind('touchmove', radians.touchDrag)
.unbind('touchend', radians.touchEnd);
return false;
};
rd.angletox = function(angle) {
return 20 + angle * (viewportw - 40) / maxangle;
};
rd.drawFullCircle = function(x0, y0, r) {
let circle = two.makeCircle(-70, 0, 50);
circle.fill = '#FF8000';
circle.stroke = 'orangered';
circle.linewidth = 5;
return circle;
};
rd.drawWedge = function(ox, oy, ir, or, sa, ea, res) {
let wedge = two.makeArcSegment(ox, oy, ir, or, sa, ea, res);
wedge.fill = '#FF8000';
wedge.stroke = 'orangered';
wedge.linewidth = 5;
return wedge;
};
rd.getAngle = function() {
console.log(angle);
return angle;
};
rd.setAngle = function(a) {
console.log(angle);
angle = a;
};
/* bind mouse/touch evenets */
jQuery(window)
.bind('mousedown', function(e) {
mouse.set(e.clientX, e.clientY);
jQuery(window)
.bind('mousemove', radians.drag)
.bind('mouseup', radians.dragEnd);
})
.bind('touchstart', function(e) {
e.preventDefault();
let touch = e.originalEvent.changedTouches[0];
mouse.set(touch.pageX, touch.pageY);
jQuery(window)
.bind('touchmove', radians.touchDrag)
.bind('touchend', radians.touchEnd);
return false;
});
/* This code is called everytime two.update() is called. */
/* Effectively 60 times per second. */
two.bind('update', function(frameCount) {
/* remove previous objects from two */
two.remove(elements);
/* calculates the number of full circles to draw */
let nfullcircles = Math.floor(angle / (2 * Math.PI));
/* draws full circles */
for (let i = 0; i < nfullcircles; i = i + 1) {
elements.push(radians.drawWedge(x0 + i * xoffset, y0, 0, radius, 0, 2 * Math.PI));
}
/* draws left of radians as a segment */
elements.push(radians.drawWedge(x0 + nfullcircles * xoffset, y0, 0, radius, 0, angle % (2 * Math.PI)));
/* translates the slidermaker to the appropriate x position for the angle */
slidermarker.translation.set(radians.angletox(angle), viewporth - 20);
}).play(); /* Finally, start the animation loop */
}
})(radians);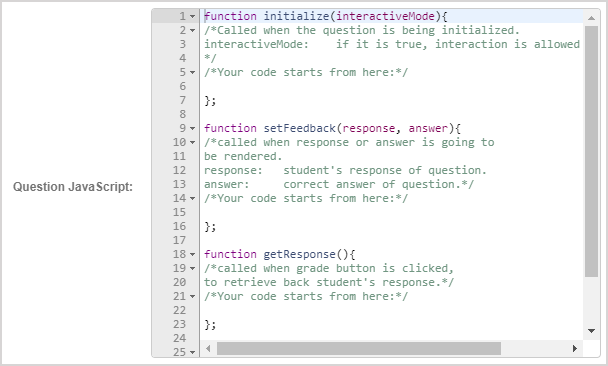
TIP: You can add notes to yourself and other authors within your JavaScript code using the following format:
/* This is a comment within JavaScript code. */Click Insert to add this student response component to the question.

The component is inserted into your question.
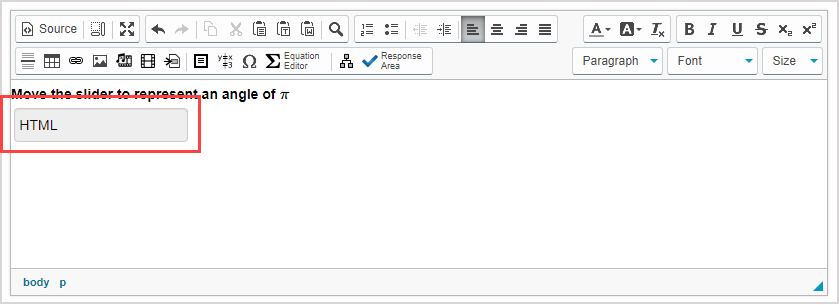
Click Preview to trial your new question to ensure that it behaves as expected.

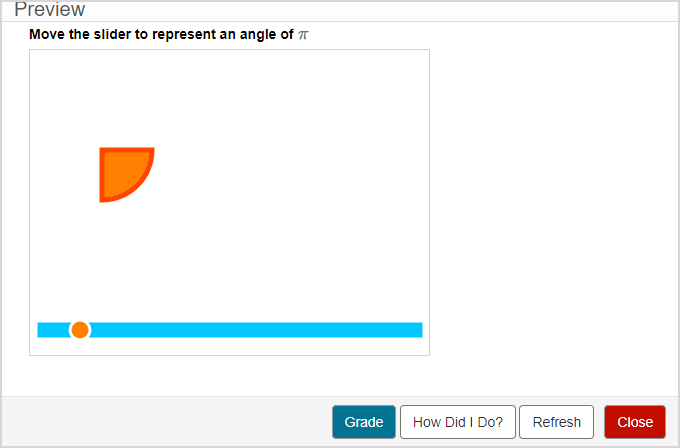
TIP: Did you use the example code from this help topic? Here's how your preview will appear:
TIP: You first have to click the save icon if you're creating this question from within an Activity Editor. After the question has been saved, you can then click the preview icon
 to ensure that your new question behaves as expected.
Click Save to save your new question. Your new question is now stored in the Questions pane of the Content Repository.

TIP: Click the save iconif you're creating this question from within an Activity Editor. This saves your question to the activity and the Content Repository.
Grading details for HTML questions
If the Grading type is set to Manually graded, it requires the instructor to manually review the student's response in the Gradebook and award a grade.
NOTE: Check out Perform manual grading for details on using the Gradebook to complete the grading for a manually graded HTML question.
If the Grading type is set to Automatically graded, then the question is graded automatically by Möbius running the grading code that you define in Step 7.
TIP: If you've created an algorithm in the Algorithm pane of the Question Editor, this algorithm should be referenced by the grading code of your HTML question.