Define assignment properties
After creating an assignment using the Assignment Editor, you can then define the properties specific to that assignment to control how a student completes the activity.
NOTE: Möbius assignments are any type of online assessment (Example — exams, homework assignments, placements tests, quizzes, unit tests, etc.).
Defining assignment properties is done on the Properties tab of the Assignment Editor.
Properties that can be defined in the Assignment Editor are:
- Type of Assignment — Choose 1 of the 5 assignment types.
- Policy Set — Choose a collection of predefined properties to control how a student completes and reviews their assignment or choose to not use a Policy Set and completely customize these properties.
- Advanced Policies — Define minimum competency requirements for the student to be able to attempt the assignment.
- Additional General Properties — Define the properties of assignment presentation.
- Scheduling & Visibility — Control the assignment visibility and availability to your students.
- Feedback (After) — Define the feedback messages given to a student after they have submitted their assignment for grading.
- Reporting — Define an email address to receive update notifications on student assignment submissions.
- IP Address/Host Names Whitelist — Control which computers can be used to complete the assignment.
IMPORTANT: If an existing activity currently has active attempts, you'll first need to force grade the active attempts in order to enable your ability to edit the activity's properties (Example — deciding to change the time limit for an assignment with in-progress attempts first requires force grading). Check out Force grade an activity.
NOTE: A new assignment that's created in a parent class is automatically inherited (except for the Text to show at the head of each page and Text to show on the results page) by a child class. Changes to that parent class’s assignment are inherited by a child class as follows:
- Changes to the assignment name, short name, and description are inherited
- Changes to the text to show at the head of each page and on the results page aren't inherited
- Changes to the assignment questions are inherited
- Changes to the assignment properties aren't inherited
- Changes to the assignment Policy Set (if a Policy Set was applied) are inherited
Only certain components of an inherited assignment can be edited within child class. Check out Edit an assignment. These edits will only apply to that child class and its descendants.
TIP: Certain assignment properties can help to ensure the security and integrity of your assignment (Example — creating your assignment as a proctored exam, limiting the number of attempts, etc.). In addition to using assignment properties to protect your assignments, you can prevent the creation of fake accounts and the enrollment of students that aren't in the class by preventing students from self-enrolling before or beyond a certain date. Check out Manage student enrollment and Edit a class. You can also remove unwanted student accounts from your class. Check out Remove a user.
Define assignment properties with the Assignment Editor
TIP: Check out the Homework & Assessment Workflows for a visual representation of how to define different assignment properties to achieve different Möbius assignment configurations:
To define the properties of the new assignment that you created from the Choose Name and Select Questions tabs of the Assignment Editor:
NOTE: You may have to click the expand icon to view certain properties.
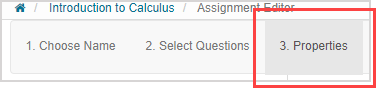
Click the 3. Properties tab in the Assignment Editor.
Select the radio button for type of assignment you want to create:
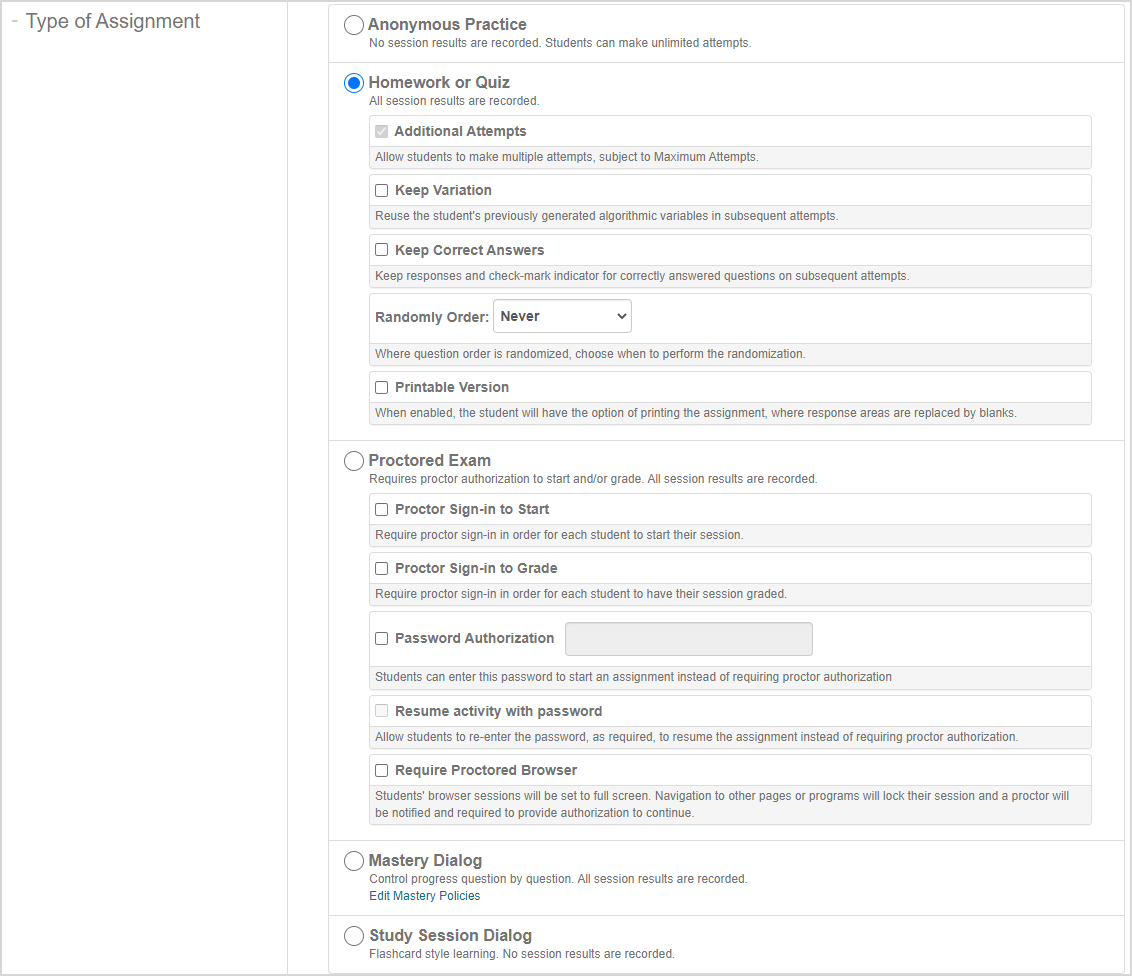
- Anonymous Practice
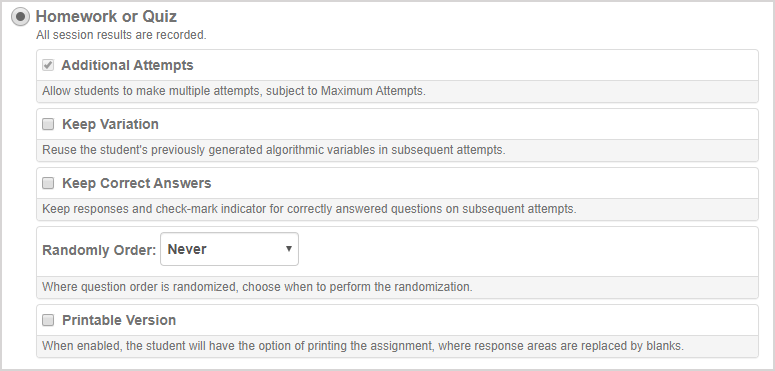
- Homework or Quiz (selected by default)
- Proctored Exam
- Mastery Dialog
- Study Session Dialog
| Property | Default Setting | Explanation of property |
|---|---|---|
| Additional Attempts | Enabled | Enabled — The student can have multiple attempts at the activity. Disabled — The student has only one attempt at the activity. |
| Keep Variation | Disabled | Enabled — The student will return to the exact versions of the activity questions on subsequent attempts, regardless of whether the questions were authored using an algorithm. Disabled — The student will view alternate versions of the activity questions on subsequent attempts. |
| Keep Correct Answers | Disabled | Enabled — When the previous attempt had a correct response to a question that is now presented on the subsequent attempt, both the correct response and check mark symbol remain visible on the subsequent attempt. Disabled — The previously submitted correct response and awarded check mark are not visible on subsequent attempts at repeated questions. |
| Randomly Order | Never | Choose when to perform question sequence randomization. Question sequence randomization is presented as Versioning on the assignment summary since question order randomization creates a new version of the activity.
|
| Printable Version | Disabled | Enabled — The student is offered the option of a printable version of the activity. The student response components are replaced by blank spaces. The activity functions as an interrupted session where the student is able to log back in to enter their responses to submit for grading. Disabled — The student isn’t given the option to print the activity and it can only be viewed online. |
| Property | Default setting | Explanation of property |
|---|---|---|
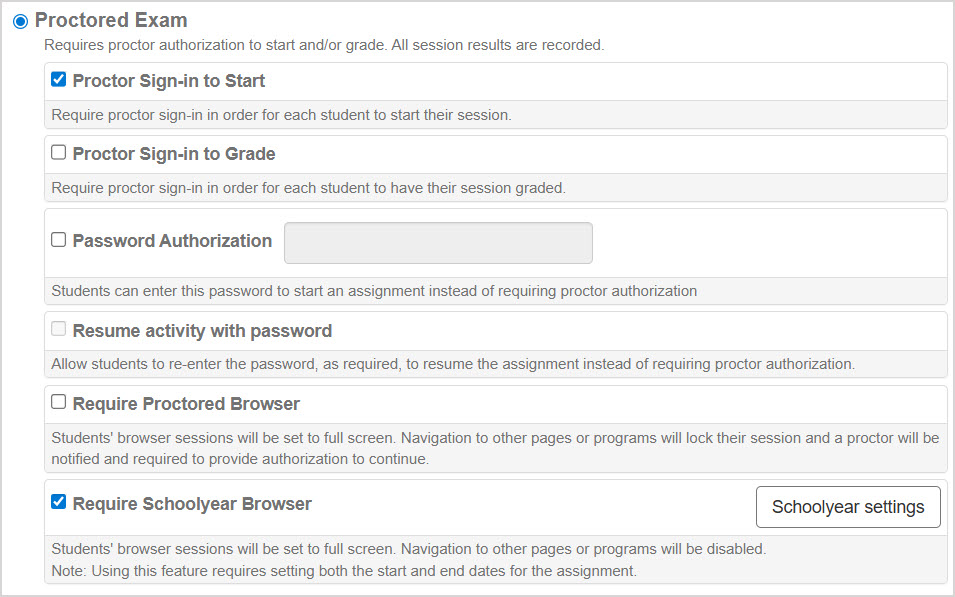
| Proctor Sign-in to Start | Enabled | Enabled — Require a proctor to log in to authorize the student to start their attempt. Disabled — A proctor is not needed to log in to authorize the student to start their attempt. |
| Proctor Sign-in to Grade | Disabled | Enabled — Require a proctor to log in to authorize the student to submit their attempt for grading. Disabled — A proctor is not needed to log in to authorize the student to submit their attempt for grading. |
| Password Authorization | Disabled | Enabled — Select the check box and define a password for the proctored exam. Distribute this password to your students, and they can enter the password on the Proctor Authorization Request page to authorize Start and/or Grade permission for their attempt at the proctored exam. No password rules exist, but the password is case-sensitive. This password can't be used to permit an exception (Example — allow additional time on a timed exam or extend the end date). Disabled — No password can be defined for your students to authorize Start and/or Grade permission for their attempt at the proctored exam. |
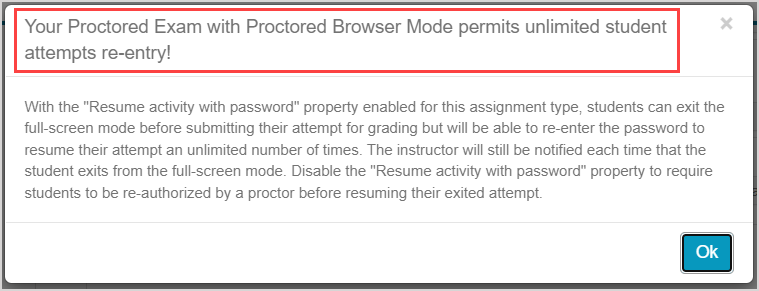
| Resume activity with password | Disabled | Enabled — Students can enter the password to re-enter their attempt at a proctored exam. Students can use the password to resume an attempt in progress, or when Require Proctored Browser is enabled and the student navigates away from the full-screen session. This option is only available if the Password Authorization setting is enabled and a password is defined. Disabled — The password can't be used by students to re-enter their attempt. Students can only use the password once to start their attempt (if Proctor Sign-in to Start is enabled) and/or to submit their attempt (if Proctor Sign-in to Grade is enabled). |
| Require Proctored Browser | Disabled | Enabled — Navigation to windows other than the activity browser session is blocked. The activity browser session is set to full-screen and if the student navigates away from the session, proctor authorization will be required to resume the attempt. Proctored Browser Mode can only be used in Google Chrome™. If a student attempts a proctored exam with Proctored Browser Mode enabled without a supported web browser, a warning message appears and the student must close the window and try again in a compatible web browser. Proctored Browser Mode also supports connections to other Learning Management Systems. Disabled — The student is able to freely navigate away from the activity browser session without requiring proctor authorization to resume the activity. |
| Require Schoolyear Browser | Disabled | Visible only if Schoolyear integration has been configured for your Möbius site. Check out Enable Schoolyear integration for a proctored exam for more details. |
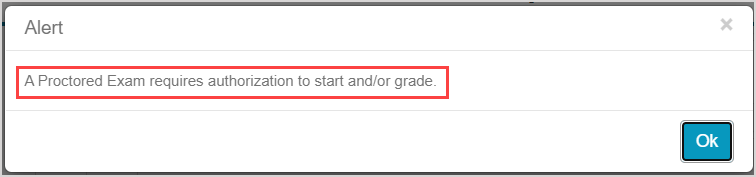
NOTE: If Proctored Exam is selected, it requires proctor authorization to start and/or submit for grading. If at least one of these options is not selected while saving your assignment properties, you will get an alert.
NOTE: When the Proctor Sign-in to Start or Require Proctored Browser properties are enabled, Show Launch Page is automatically set.


TIP: Creating your assignment as a proctored exam promotes assignment integrity and security since requiring proctor or password authorization promotes the integrity of your assignment, test, or exam. In addition, Proctored Browser Mode allows student navigation to be moderated during their attempt. Check out Create a proctored exam and Enable Proctored Browser Mode.
IMPORTANT: When both Password Authorization and Resume activity with password are enabled, the password can be used to resume any proctored exam an unlimited number of times. When you also enable Require Proctored Browser, an alert will pop up to remind you that with these settings, the password can be used to exit and re-enter the full-screen Proctored Browser Mode. In that scenario, it's recommended to avoid providing students with the password.
If you are building a mastery dialog, click Edit Mastery Policies.

TIP: Check out Define Mastery Policies for more help with defining the Mastery Policies for your new Mastery Dialog.
Click Advanced Policies to set the Advanced Policies for your assignment.
TIP: Check out Define Advanced Policies for help with defining the Advanced Policies for your new assignment.
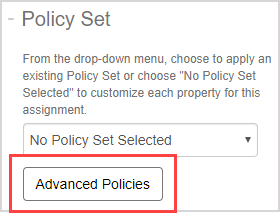
Select an existing Policy Set from the drop-down list. A read-only preview is displayed of the selected Policy Set (if you do not want to use an existing Policy Set and want to fully customize the properties for this assignment, see step 6). If you have selected a Policy Set, skip to step 11.
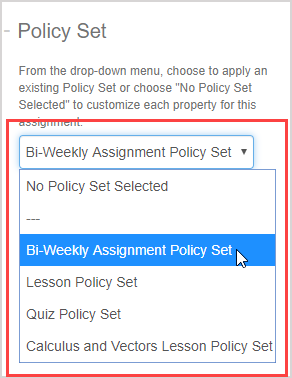
To fully customize the properties for this assignment (instead of applying an existing Policy Set), select No Policy Set Selected from the drop-down list.
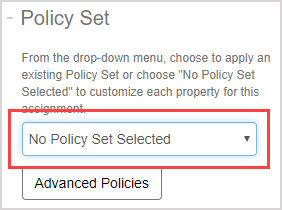
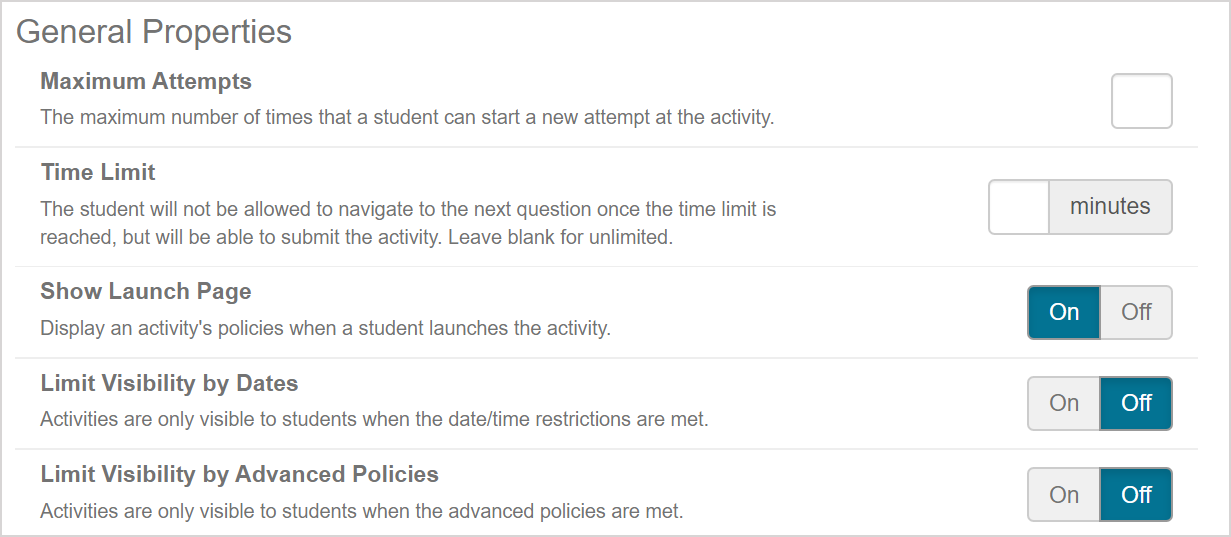
If no Policy Set is being applied to this assignment, customize the General Properties for this assignment.
| Property | Default setting | Explanation of property |
|---|---|---|
| Maximum Attempts | Unset | Enabled — Set the maximum number of allowed attempts at this activity. Enter any number up to 3 digits. If the student exceeds the maximum number of allowed attempts, a message displays prior to the start of the final attempt indicating the attempt restriction. For an exception after the allowed maximum number of attempts, a student can click Request Exception (at the start of the illegal attempt) and a proctor or instructor must log in to permit the additional attempt. Disabled — Leave unset for an unlimited number of allowed attempts. |
| Time Limit | Unlimited | Enabled — If a time limit is set (measured in minutes), the time remaining to complete the activity is continuously displayed while the activity is in progress. The timer flashes red for 10 seconds when 5 minutes remain. The timer is red for the remaining time, and flashes again when the time limit has expired. If the time limit expires while the activity is in progress, the student won't be able to enter any additional responses (even if they're in the process of entering a response) or navigate to another question. However, the student is still able to submit their activity (whether all questions are completed or not). The timer does not stop until the student runs out of time or clicks Submit Assignment. The timer will continue to run even if the student clicks Quit & Save. Disabled — Leave blank for unlimited time limit (no time limit). |
| Show Launch Page | On | On — When a student begins their attempt, the first screen displayed is a preview of the activity properties. Off — The student is not given a preview of the activity properties and immediately begins their attempt. |
| Limit Visibility by Dates | Off | On — The activity is only visible to the student on their Class Homepage and calendars from the defined Start Dates/Times to the End Dates/Times. Off — The activity is always visible to the student on their Class Homepage and calendars outside of the Start and End Dates/Times but unavailable for attempts. |
| Limit Visibility by Advanced Policies | Off | On — The activity is only visible to the student on their Class Homepage and calendars if the student has satisfied the Advanced Policies. Off — The activity is always visible to the student on their Class Homepage and calendars regardless of the requirements of the Advanced Policies. |
NOTE: If the Maximum Attempts property is defined, the Show Launch Page property is automatically enabled.

NOTE: Using an adaptive question in an activity with a time limit applied does permit the student to complete the entire adaptive question even after the time limit has expired. However, the student won't be able to navigate to another question once the time limit has expired. Check out Author an adaptive question for more information on authoring adaptive questions.
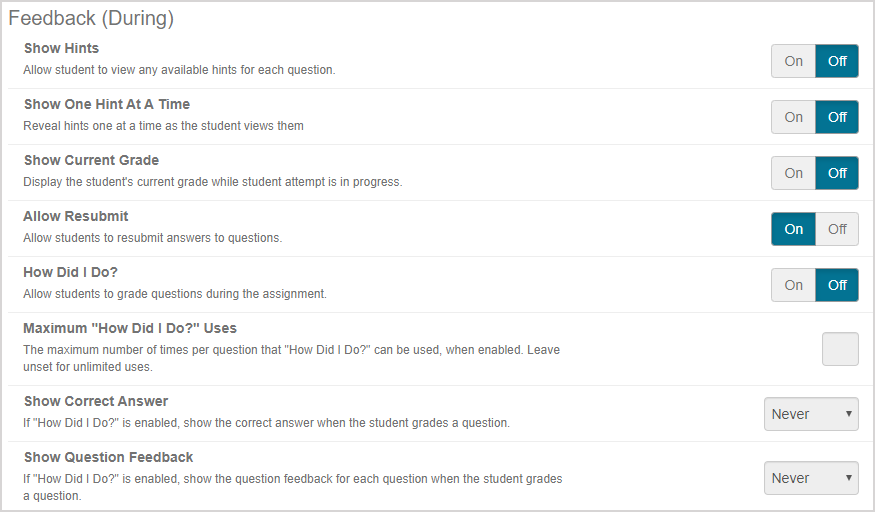
If no Policy Set is being applied to this assignment, customize the Feedback (During) properties that control what is allowed while the assignment is in progress.
| Property | Default setting | Explanation of property |
|---|---|---|
| Show Hints | Off | On — The student can view available hints for each question. Off — No hints are revealed to the student. |
| Show One Hint At A Time | Off | On — Reveal hints 1 at a time when Show Hints is enabled. Off — All available hints for a question will be revealed simultaneously when Show Hints is enabled. |
| Show Current Grade | Off | On — Display the student’s current grade for the activity while it is in progress. Off — Do not display the student’s current grade for the activity while it is in progress. |
| Allow Resubmit | On | On — Once a student has submitted a response to a question and moves on to the next question, they are allowed to return to a previous question to re-enter a response. Off — Once a student has submitted a response to a question and moves on to the next question, they can’t return to a previous question to re-enter a response. |
| How Did I Do? | Off | On — The How Did I Do? button is visible for the student to click to check the correctness of their response while the activity is in progress. Off — The How Did I Do? button isn't visible and the student can’t check the correctness of their response while the activity is in progress. |
| Maximum “How Did I Do?” Uses | Unlimited | Enabled — A maximum number of times per question that a student can use the How Did I Do? function. Disabled — Leave blank for unlimited usage of the How Did I Do? function. |
| Show Correct Answer | Never | Choose to display the correct answer when a student uses the How Did I Do? function during the activity. Choose from:
|
| Show Question Feedback | Never | Choose to display feedback (response-level feedback and question feedback) when a student uses the How Did I Do? function during the activity. Choose from:
|
TIP: Consider the following scenarios when enabling certain property combinations:
- Use caution when both Allow Resubmit and How Did I Do? are enabled since this provides students with the equivalent of a solution manual while attempting the activity.
- Use caution when both Show Current Grade and How Did I Do? are enabled since this permits students to get immediate feedback on questions and then retry the activity.
- Define a value for Maximum Attempts and set the Feedback (during) and Feedback (after) properties to only show correctness or grade (and not full solutions).
TIP: Be aware of what type of information is contained within your authored hints and feedback (Example — some instructors or authors may choose to author feedback with the full solution, which may not always be appropriate depending on your class and activity).
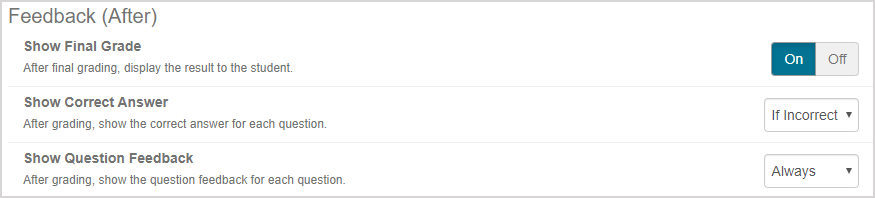
If no Policy Set is being applied to this assignment, customize the Feedback (After) properties that control what is visible to the student after the assignment is graded and recorded in the Gradebook
| Property | Default setting | Explanation of property |
|---|---|---|
| Show Final Grade | On | On — Display the student’s final grade achieved for the activity. Off — Do not display the student’s final grade for the activity. |
| Show Correct Answer | If Incorrect | Choose to display the correct answer for each question when the activity is graded. On the final results screen, the student will have the option to print their results. Choose from:
|
| Show Question Feedback | Always | Choose to display question feedback for each question when the activity is graded. On the final results screen, the student will have the option to print their results. Choose from:
|
TIP: Be aware of what type of information is contained within your authored feedback (Example — some instructors or authors may choose to author feedback with the full solution, which may not always be appropriate depending on your class and activity).
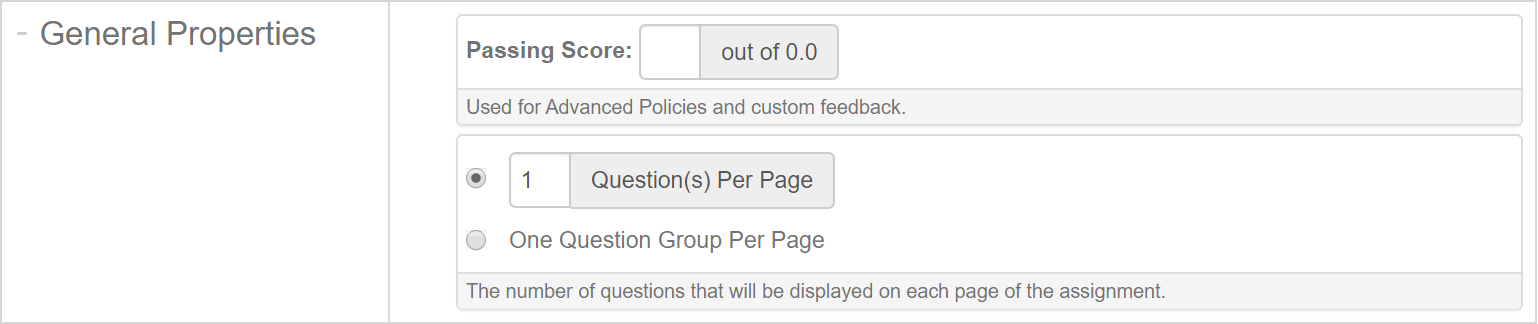
Set the additional General Properties for the assignment
| Property | Default setting | Explanation of property |
|---|---|---|
| Passing Score | Disabled | Enabled — Set a minimum passing score so that the system assesses each attempt as either pass or fail. This pass or fail is then automatically recorded in the Gradebook. The Passing Score total (out of n) is determined by the total points (n) available from the 2. Selected Questions tab of your Assignment Editor. Disabled — The system will not determine pass or fail and will only display the actual grade when no Passing Score entered. |
| Questions Per Page | 1 | Choose how many questions to display per page of the activity. The number of questions displayed per page can be edited (more than 5 gives a warning dialog). Or, select the radio button to display an entire question group on one page. |
| Property | Default setting | Explanation of property |
|---|---|---|
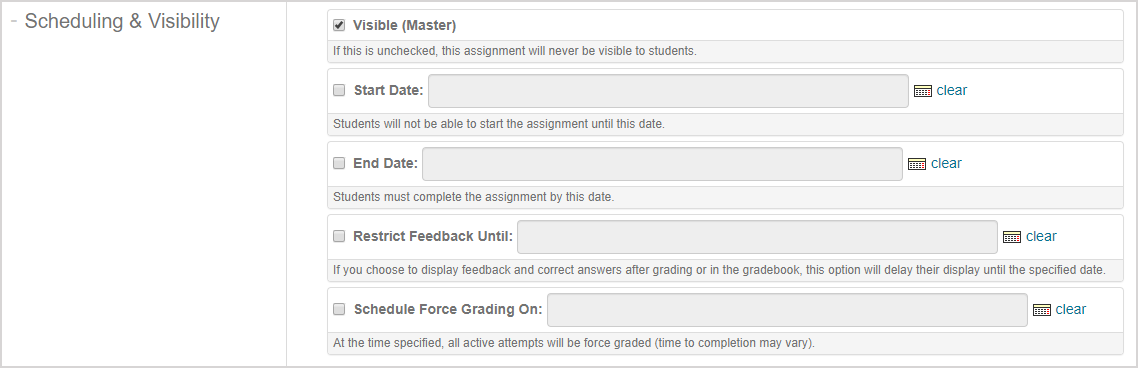
| Visible (Master) | Enabled | Enabled — The activity is visible to the student on the Class Homepage and calendars. Disable — The activity is hidden from the Class Homepage and calendars and only visible to you in the Content Repository and to the student, if completed, as a past result in the Gradebook. |
| Start Date | Disabled | Enabled — Select the check box for today’s date to autofill. Or, set a specific Start Date (and time) for the activity using the drop-down calendar. This determines the activity availability to the student; the activity can’t be started until this date and time. Before the indicated date and time, the activity is not available to attempt. If scheduling has been set, a calendar icon Disabled — If you do not enter a start date and time, the activity becomes available immediately after it is created. Click clear beside the calendar icon or deselect the check box to disable Start Date. |
| End Date | Disabled | Enabled — Select the check box for today’s date to autofill. Or, set a specific End Date (and time) for the activity using the drop-down calendar. This determines the activity availability to the student; all responses and work on the activity must be entered before this date and time. After the indicated date and time, the activity is not available to attempt. If scheduling has been set, a calendar icon Disabled — If you do not enter an end date and time, the activity remains available indefinitely. Click clear beside the calendar icon or deselect the check box to disable End Date. |
| Restrict Feedback Until | Disabled | Applies to the student viewing feedback and their attempt submission details. Enabled — Select the check box for today’s date to autofill. Or, set a specific date and time using the drop-down calendar to display when feedback and correct answers are revealed. The student won't be able to click View Details after submitting their attempt to view question feedback. The student won't be able to view their attempt details in the Gradebook until this date. This is the Feedback Date on the Class Schedule. Disabled — The student can click View Details after submitting their attempt and view their attempt details in their Gradebook. Click clear beside the calendar icon |
| Schedule Force Grading On | Disabled | Enabled — Select the check box for today’s date to autofill. Or, set a specific date and time using the drop-down calendar for when all active attempts will be force graded. This is the Force Grade Date on the Class Schedule. The time for the system to complete Force Grading may vary. Disabled — Active attempts will not be force graded. Click clear beside the calendar icon |
 appears next to the activity in the Content Repository.
 appears next to the activity in the Content Repository.
 or deselect the check box to disable
  or deselect the check box to disable
 TIP: Consider the following scenario when using the Restrict Feedback Until property:
- Define a date for Restrict Feedback Until as after the activity due date has passed.
This prevents students who finish the activity early from revealing answers to other students.
NOTE: Instructors can view unavailable activities (activities that are visible but not accessible to students) in the Lessons & Assignments pane in the Content Repository.
NOTE: The time zone for scheduling is based on the class time zone setting (which defaults to a Möbius site-wide time zone). Check out Class details fields.
Set the additional Feedback (After) properties that control what is visible to the student after the assignment is graded and recorded in the Gradebook

| Property | Default setting | Explanation of property |
|---|---|---|
| Set Grading Message | If Show Final Grade is on: Your assignment is complete. You scored (score) out of (total). If Show Final Grade is off: none | If Show Final Grade is enabled, a default grade summary message appears (Your assignment is complete. You scored (score) out of (total).) or you can define a custom message. If Show Final Grade is disabled, the message is blank. You can click Use Default Value for a default message (Your assignment has been submitted for grading, but results are not immediately available. Please contact your instructor to get your grade and receive feedback on your work.), or define a custom message. |
| Set Pass/Fail Message | Pass Feedback: none Fail Feedback: none | If Passing Score has been set, the message is blank. You can click Use Default Value for Pass Feedback (You have passed.) and for Fail Feedback (Your score was below the minimum passing score set by your instructor.), or define custom messages. |
| Show Pass/Fail Message | If Final Grade is Shown | Choose when to display the defined pass or fail messages to the student if Passing Score has been set. Choose from:
|

| Property | Default setting | Explanation of property |
|---|---|---|
| Email Reports To | Disabled | Select the Email Reports To check box and enter email address recipients for emails to be sent to when a student completes the activity. A list of email addresses, separated by commas, can be used. The email body contains the following information:
The same information will be attached to the email in the file format selected from the With Attachment drop-down menu (select None for no email attachment). |
| Property | Default setting | Explanation of property |
|---|---|---|
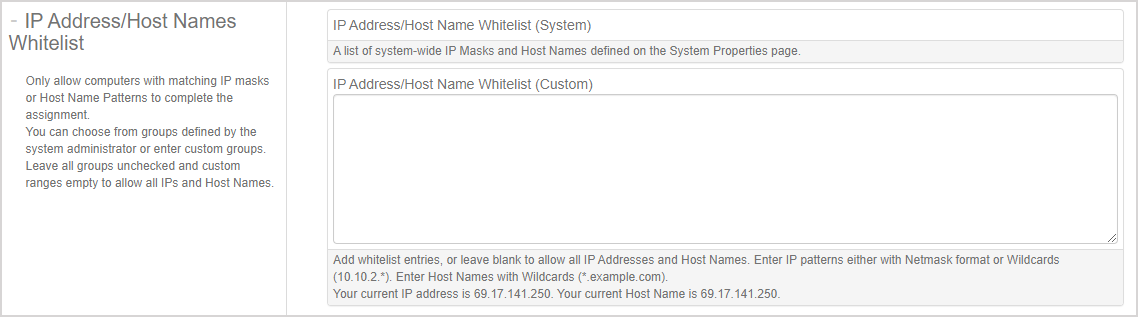
| IP Address/ Host Names Whitelist | Disabled | Enabled — Only allow computers with matching IP masks or host name patterns to complete the activity. You can select the check boxes of groups defined by your organization's Möbius administrator using the IP Address/Host Name Whitelist (System) list or enter custom groups using the IP Address/Host Name Whitelist (Custom) text entry area. Enter only one IP address or pattern per line. IP addresses can be listed individually, with patterns, with wildcards (Example — *.digitaled.com), or using Netmask format (Example — 10.10.2.*). Disabled — Leave all system groups unchecked and custom groups empty to allow all IPs and Host Names to be used for attempting the activity. |
Click Save & Close to save your assignment.

NOTE: Click Save to save your progress and continue working in the Assignment Editor.

Review the assignment summary page.
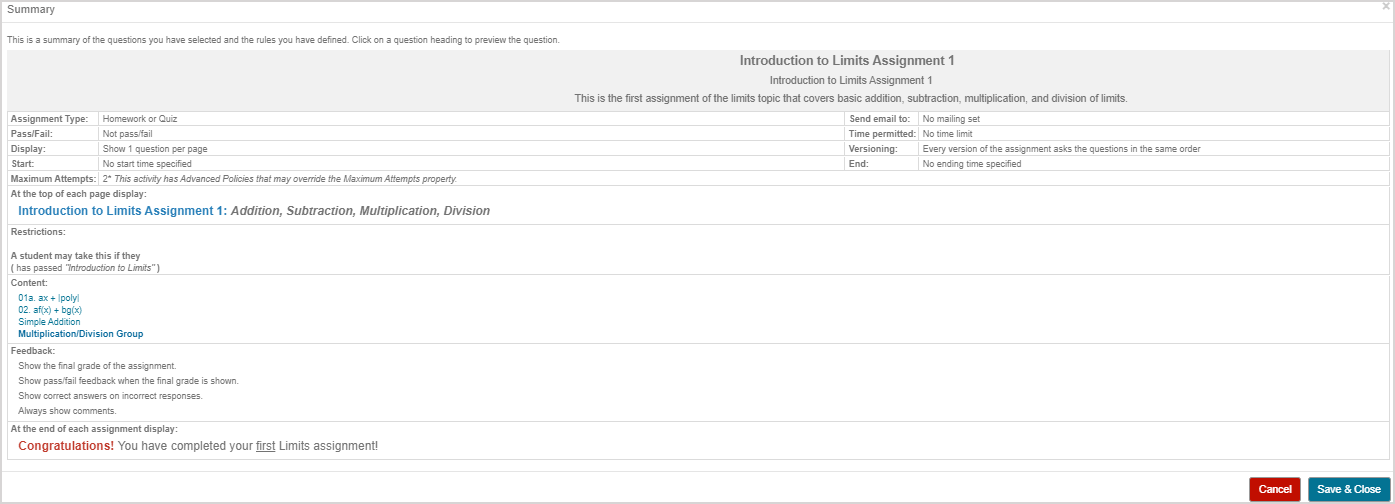
NOTE: To make changes to the properties you defined, click Cancel in the summary window to return to the Assignment Editor.
Click Save & Close to accept the assignment properties. Its visibility and availability to your students on the Class Homepage and Calendar depend on the properties you defined.
What's next?
Now that you've understood assignment properties, you're ready for: