Use the Visual Editor
Jump to section
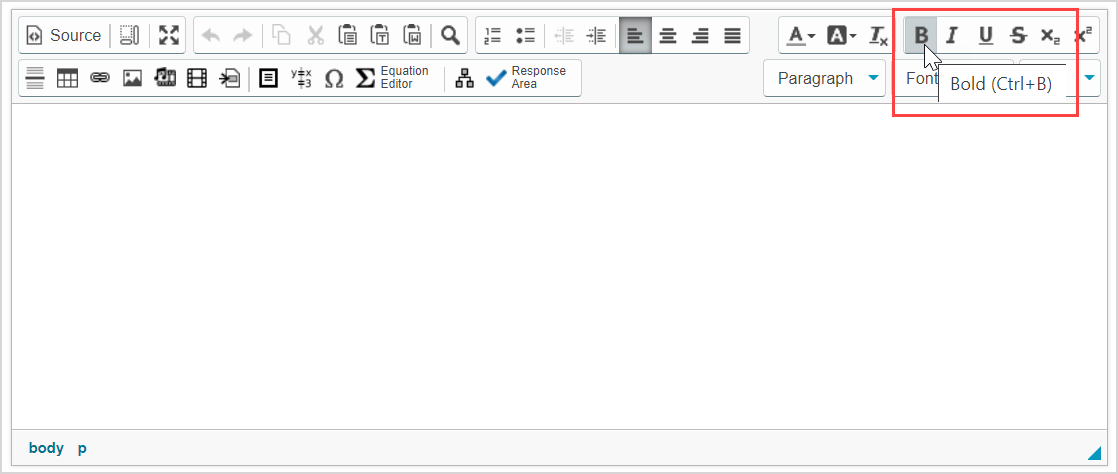
The Visual Editor is a toolbar that's found throughout Möbius that you can use to control the visual appearance of different components of your class and content.

TIP: Did you come across a toolbar similar to this while working in Möbius? Be sure to refer back to this help topic to learn about each individual icon that's available for the area of Möbius that you're working in! The available options may vary depending on what part of Möbius you're accessing the toolbar from.
You'll use the Visual Editor while:
- Writing your class description
- Authoring question text
- Authoring a question hint
- Authoring an interactive narrative
- And during many other Möbius tasks
The Visual Editor can be used to:
- Control the display of the text entry field you're working in
- Format and style text and objects
- Edit text and objects
- Insert objects and content
- Enter mathematical symbols and characters
- Add interactive components where the student enters a response
- And more...
This help topic explains all of the available icons that can be found within the Visual Editor.
TIP: Hover your cursor over an icon in the Visual Editor to reveal a tool tip about the icon's function.
TIP: Click an icon to enable it. Most icon functions can be disabled by clicking it again.
Control the display of the text entry field
These icons control the overall display of the text entry field that you're working in:
| Icon | Icon name | Keyboard shortcut | Description |
|---|---|---|---|
 | Source | N/A | Used to display the text field in its pure HTML source. TIP: Check out Use the Source icon for some extra tips on how to use this operation. |
 | Show Blocks | N/A | Displays the layout of block elements in the text entry field. |
 | Maximize | N/A | Expands the text entry field to full-screen. |
*N/A — Not available
Edit using general functions
These icons allow for general editing of text and objects:
| Icon | Icon name | Keyboard shortcut | Description |
|---|---|---|---|
 | Undo | Ctrl+Z | Removes the most recent change. |
 | Redo | Ctrl+Y | Replaces the most recent undo action. |
 | Copy | Ctrl+C | Adds a copy of the select text or objects to your clipboard. |
 | Cut | Ctrl+X | Crops the selected text or objects to your clipboard. |
 | Paste | Ctrl+V | Inserts text or objects from your clipboard. |
 | Paste as plain text | Ctrl+Shift+V | Inserts text as non-formatted and untagged text from your clipboard. |
 | Paste from Word | N/A | Inserts proper importing of text or objects from Microsoft Word from your clipboard. |
 | Find | N/A | Enables a search function and a search-and-replace function. In the Find and Replace window that appears, select either the Find tab or Replace tab, enter the text of interest, and select to:
|
*N/A — Not available
Format text
These icons allow for the formatting of entered text:
| Icon | Icon name | Keyboard shortcut | Description |
|---|---|---|---|
 | Insert/Remove Numbered List | N/A | Manages ordered (numbered) lists. |
 | Insert/Remove Bulleted List | N/A | Manages unordered (bulleted) lists. |
 | Decrease Indent | N/A | Shifts text to the left by a set increment. |
 | Increase Indent | N/A | Shifts text to the right by a set increment. |
 | Align Left | N/A | Lines text up to the left side of the containing element. |
 | Center | N/A | Lines text up to the center of the containing element. |
 | Align Right | N/A | Lines text up to the right side of the containing element. |
 | Justify | N/A | Lines up text to be flush with both sides of the containing element. |
*N/A — Not available
Style text
These icons allow for the styling of entered text:
| Icon | Icon name | Keyboard shortcut | Description |
|---|---|---|---|
 | Text Color | N/A | Defines the color of the text. Choose from a selection of pre-selected colors, or click More Colors to enter your own hex code for a specific color. |
 | Background Color | N/A | Defines the highlight color of the text. Choose from a selection of pre-selected colors, or click More Colors to enter your own hex code for a specific color. |
 | Remove Format | N/A | Resets the styling of selected text. |
 | Bold | Ctrl+B | Boldfaces text. |
 | Italic | Ctrl+I | Italicizes text. |
 | Underline | Ctrl+U | Underlines text. |
 | Strikethrough | N/A | Places a horizontal line through the midline height of text. |
 | Subscript | N/A | Transforms highlighted text to subscript or moves cursor to subscript position if no text is highlighted. |
 | Superscript | N/A | Transforms highlighted text to superscript or moves cursor to superscript position if no text is highlighted. |
 | Formatting Styles | N/A | Choose the type of block element to be applied from the drop-down list. |
 | Font Name | N/A | Choose the font family to apply from the drop-down list. |
 | Font Size | N/A | Choose the font size to apply from the drop-down list. |
*N/A — Not available
Insert objects
These icons allow for inserting objects:
| Icon | Icon name | Keyboard shortcut | Description |
|---|---|---|---|
 | Insert Horizontal Line | N/A | Inserts a horizontal line that spans the containing element for section separation. |
 | Table | N/A | Displays the Table Properties window to define the details of the table to be inserted. Select the Table Properties tab to define the table layout or the Advanced tab for additional language and styling details. |
 | Link | Ctrl+L | Displays the Link window to define the details of the linked item. NOTE: You can use any URL that points to an external resource if the URL will be continuously available. For external resources, enter the full URL. However, it's recommended that you use items from your Class File Manager. |
 | Image | N/A | Displays the Image Properties window to define the details of the uploaded image. TIP: To insert an image, it must first be uploaded to your Class File Manager. Check out Manage folders in the Class File Manager for uploading supporting content. NOTE: You can use any URL that points to an external resource if the URL will be continuously available. For external resources, enter the full URL. However, it is recommended that you use items from your Class File Manager. |
 | Embed External Content | N/A | Displays the Embed External Content window that can take a supported URL and embed that content into your text area. You can define the URL of the uploaded photo file, video file, audio file, or application, and define the display settings for the external content. NOTE: If the web service doesn't directly support the oEmbed format, Möbius will still attempt to generate the appropriate embed code. TIP: In some cases, Möbius might not be able to generate the appropriate embed code, or the automatically-generated embedding might not display the application in the desired manner. If this occurs, you can create the embed code yourself or copy it from the third party website and insert the embed code into your question using the Source icon |
 | Insert Video | N/A | Displays the Video Properties window to define the details of the uploaded video. TIP: To insert a video, it must first be uploaded to your Class File Manager. Check out Manage folders in the Class File Manager for uploading supporting content. NOTE: You can use any URL that points to an external resource if the URL will be continuously available. For external resources, enter the full URL. However, it is recommended that you use items from your Class File Manager. |
 | Import from Repository | N/A | Displays your Content Repository where you can select existing content to import. NOTE: When importing content authored by another user, it's recommended that you clone the original content first since any changes made to it by the original author will automatically be distributed to anywhere the content is inherited. |
 | Set Background Color | N/A | Applies a background color for the selected slide while authoring an interactive narrative. |
 | Add to Glossary | N/A | Allows a glossary term and entry to be defined while authoring an interactive narrative. TIP: Check out Use the Add to Glossary icon for some extra tips on how to use this operation. |
 | Add Block | N/A | Inserts a block element. TIP: Hover your cursor over the inserted block and click Edit to modify the block element.
|
 | Floating Box | N/A | Inserts a frame that can be freely relocated throughout a slide while authoring an interactive narrative. |
 | Column Group | N/A | Inserts a new column element to a slide while authoring an interactive narrative. |
 | Align Environment | N/A | Generates an invisible table for the alignment of inputted text and media. TIP: Check out Use the Align Environment icon for some extra tips on how to use this operation. |
 | Quick Symbols | N/A | Displays the Quick Symbols palette where Math Mode or Text Mode symbols can be selected and inserted into the text entry field. |
 | Equation Editor | Ctrl+Shift+E | Displays the Equation Editor for equations to be inserted into the text entry field with proper formatting and syntax. You'll have access to the default and chemistry palettes. TIP: Check out Work with the Equation Editor (instructor) for some extra tips on how to use this operation. |
 | Insert/Edit Adaptive Section | N/A | Displays the Adaptive Section window and inserts an adaptive question section in the text entry field. Adaptive, multi-part questions can be designed where one sub-question (or section) is presented at a time and the question behavior depends on whether the student answers the sub-question correctly. TIP: Check out for Author an adaptive question for some extra tips on how to use this operation. |
 | Möbius component | N/A | Displays the Insert Möbius component menu where the type of component is defined. Adding a student response component qualifies the content item as a question. TIP: Check out View available question types to view the different types of Möbius components. |
 from the Visual Editor.
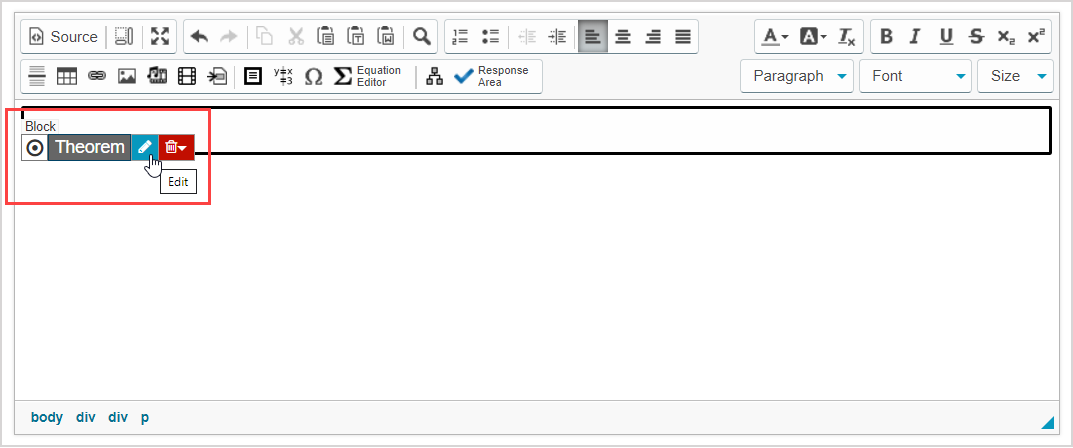
*N/A — Not available