Navigate the administrator System Homepage
Jump to section
The System Homepage is the first page you will land on after logging in to Möbius.
It acts as the main access point to the rest of your Möbius organization.
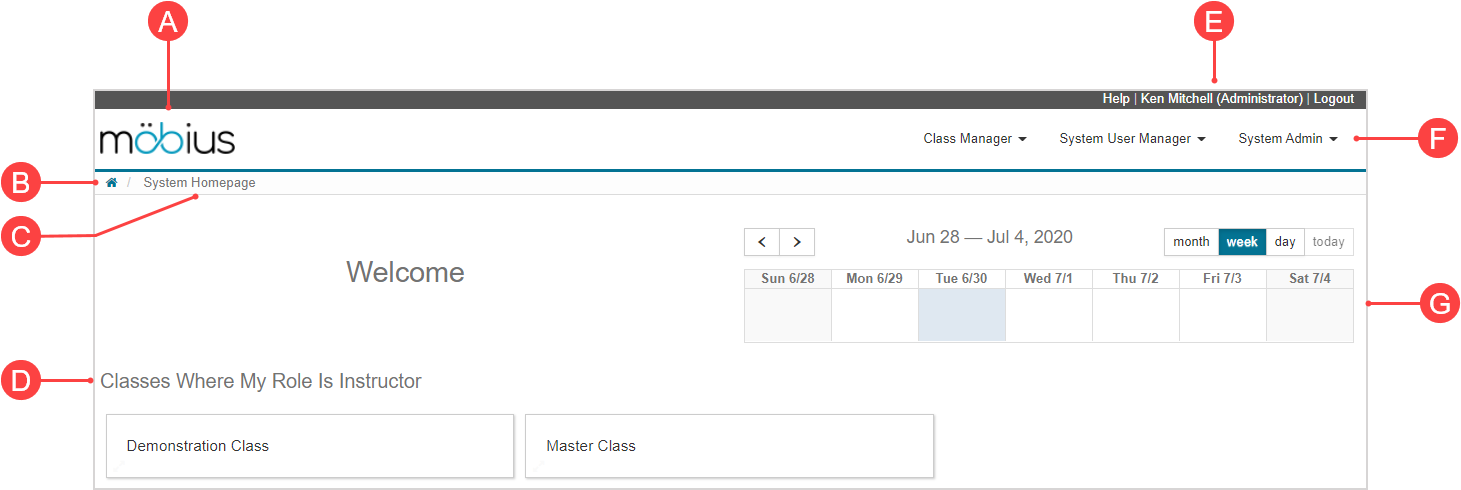
System Homepage display
The System Homepage displays:

- A.Möbius logo — Click at any time to return to the System Homepage.
- B.Home icon — Click at any time to return to the System Homepage.
- C.Breadcrumb — Informs you of which page you are on and can be clicked on to return to a specific page in the breadcrumb trail.
- D.Class List pane— Directory of all classes that you're associated with.
- E. Your name — Your name which can be clicked to view and edit your user profile.
- F.Menus — System Homepage menus for system-related functions dependent on your system role.
- G.System Calendar — Calendar that displays all scheduled dates for your organization.
System Calendar
The System Calendar displays:

- All organization-wide events that are relevant to your Möbius site.
- All class events and activity dates that are relevant to the classes you're associated with.
- All private events that you have scheduled.
TIP: Check out Work with the calendars.
Class List pane
The Class List pane is a directory of all classes that you're associated with.

NOTE: The Demonstration Class is a showcase of the capabilities of Möbius content and might not be visible to you (depending on the arrangement of administrators within your organization).
NOTE: Administrators are automatically enrolled in the Master Class which functions as a parent class to every class within your organization. You can also enroll instructors into this class to help mange the content that it contains. Any content in the Master Class's Content Repository is automatically inherited by all other classes within your organization. This also means that any changes to the Master Class's content automatically propagate to all other classes. Example — You could create a theme in the Master Class's Content Repository. This theme is then available to all classes within your organization so that all classes have the potential to have the same CSS styling for their content.
NOTE: You may have class roles in specific classes that are different from your system role. This means that certain classes will display under different headings in the Class List pane (Example — if you have a system role of administrator but have also enrolled as a student in a specific class within your organization, the class that you're enrolled in as a student is listed under the heading Classes I Am Taking). Check out View my classes to learn how classes that you're enrolled in are organized in this pane.
Clicking on a class name takes you to the Class Homepage for that specific class.

TIP: Check out Navigate the instructor Class Homepage to learn what you can do from the Class Homepage.
NOTE: If you create a class, you'll automatically be assigned as the instructor and the class will appear listed under the Classes Where My Role Is Instructor heading on your System Homepage. You can reassign the primary instructor at anytime. Check out Change the primary instructor.
Class Manager
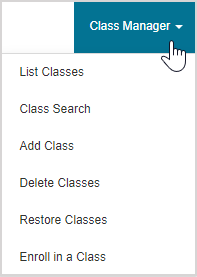
The Class Manager menu on the System Homepage contains options that relate to managing classes within your organization:

- List Classes — View all active and previously deleted classes (check out View the classes in my organization (administrator)).
- Class Search — Perform a search for a specific class (check out Search for a class (administrator)).
- Add Class — Create a new class (check out Create a class).
- Delete Classes — Delete an active class (check out Delete a class).
- Restore Classes — Recover a previously deleted class (check out Restore a deleted class).
- Enroll in a Class — Enroll in a class as a student (check out Enroll in a class).
System User Manager
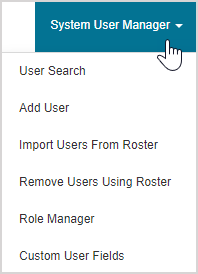
The System User Manager menu on the System Homepage contains options that relate to managing the users within your organization:

- User Search — Perform a search for specific users to view and edit their profile (check out Search for a user).
- Add User — Create a new user profile (check out Create a user).
- Import Users From Roster — Import a user roster file to add users to Möbius in bulk (check out Work with a user roster file).
- Remove Users Using Roster — Remove users from the database in bulk using a user roster file (check out Delete a user).
- Role Manager — View and edit the privileges of each type of user within your organization (check out Manage user roles (administrator)).
- Custom User Fields — Create and manage data fields that appear in user profiles (check out Create custom user fields).
System Admin
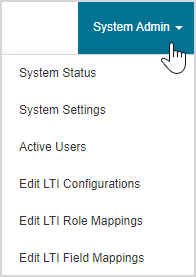
The System Admin menu on the System Homepage contains options that relate to managing the configuration of your organization's Möbius site:

- System Status — View a read-only summary of connections, recent usage, and overall status of your site (check out View system status).
- System Settings — View the settings that manage the back-end functionality of your site (check out View system settings).
- Active Users — View all users that are currently in an active session of Möbius within your site (and force users to log off if needed) (check out View active users).
- Edit LTI Configurations — Manage your site's LTI connections (check out Configure an LTI 1.3 connection).
- Edit LTI Role Mappings — Manage how roles from your Learning Management System are mapped to Möbius roles (check out Configure LTI role mapping).
- Edit LTI Field Mappings — Manage your site’s user fields to avoid duplicate records when connecting your Möbius site to a Learning Management System (check out Configure LTI field mapping).
What's next?
Now that you've understood the System Homepage, you're ready for: